close
Below you will find a listing of training resources such as Microsoft Office, Telecommuting, Moodle, Zoom, Panopto, Poll Everywhere, and other widely used resources at the college.
Most of the information provided do not require you to login, however, some resources tied to the Infobase Learning Cloud platform will ask for your network account information. You need to use your network account login info to get access to all Infobase tutorials. Infobase is an online learning platform with a robust library of modules that provides continuous and in depth support for ongoing learning.

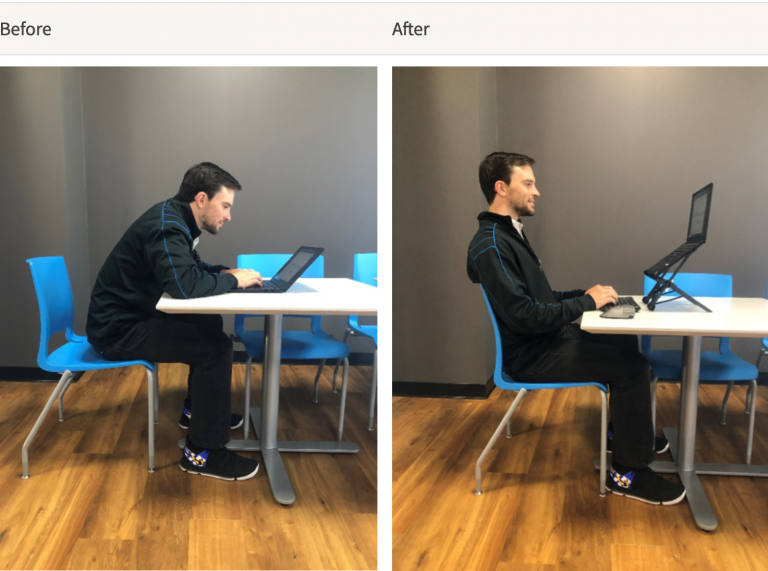
Whether working at home, the local coffee shop or at another office on campus, it is imperative to set-up your workstation to allow for neutral postures. The cumulative effect of working on laptops, cell phones, and tablets may increase the risk of chronic neck/shoulder injuries and repetitive stress injuries of the hands and wrists.
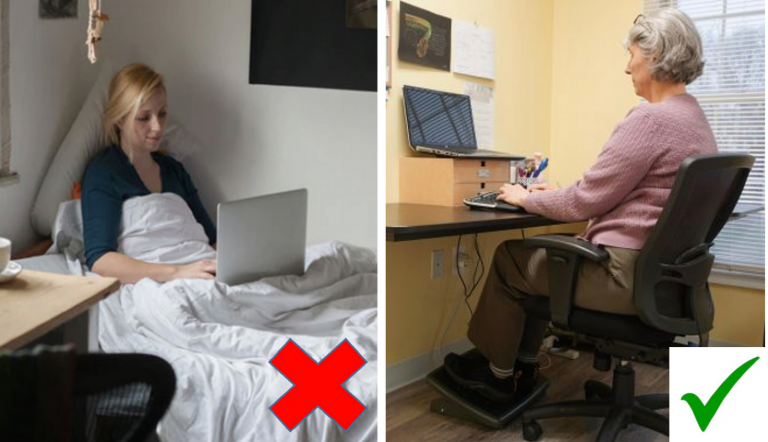
When telecommuting, we recommend the use of an:
Chair:
Work Surface:
Monitor:
Work Surface:
Monitor:
Things to Consider when Working from Home:
Breaks:
Microsoft 365 refers to a subscription plan that includes access to Office applications plus other productivity services that are enabled over the Internet (cloud services). Microsoft 365 include services such as Microsoft Teams (web conferencing) and Outlook for the Web (hosted email), and online storage with OneDrive for Business.
Our Microsoft 365 subscription include the desktop version of the latest Office applications, which users can install across multiple computers and devices. The fully installed applications include: Word, Excel, PowerPoint, OneNote, Outlook, Publisher, and Access. (Publisher and Access are available on PC only.) And you can install them across multiple devices, including PCs, Macs, Android tablets, Android phones, iPad, and iPhone. In addition, you always have the most up-to-date version of the applications.
To access the customized Microsoft 365 login page, use the link below:
or at the bottom left of the web page, you will see a link for Office 365.
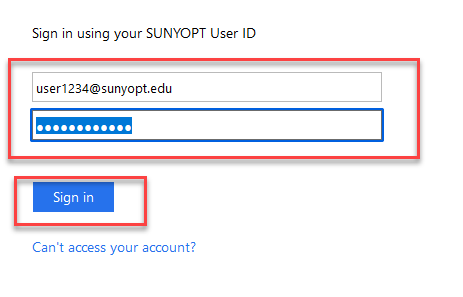
For login purposes only, use the following username format:
Username: userxxxx@sunyopt.edu; the prefix is your Network User Account username
Password: Your computer password
To get the Outlook Web App onto your mobile device, use one of the links below:
For the Outlook Web App setup instructions for your mobile device, use one of the links below:
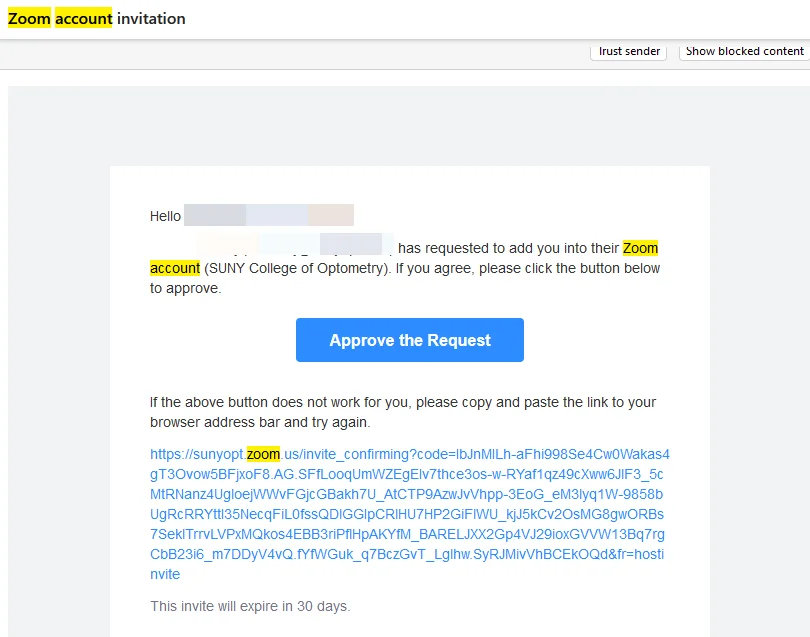
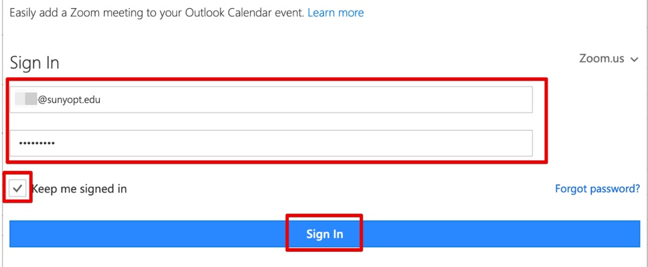
As a new SUNYOPT Zoom user, you’ll receive an email invite which you need to approve by signing up with your SUNYOPT email address and a new password you’d like to create. The Subject Line of the email will say: Zoom Account Invitation and the email body would look like the below image.
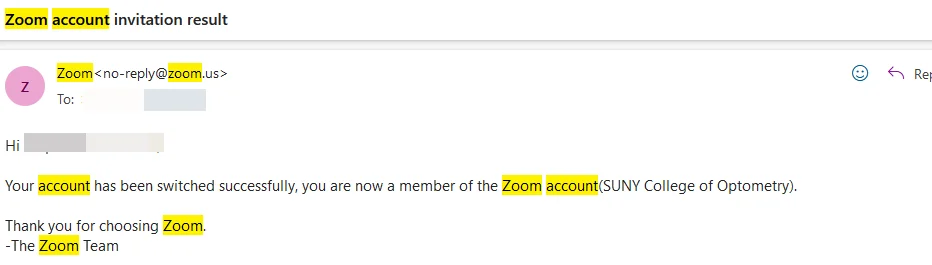
If you have an existing Zoom account using your SUNYOPT email and are prompted to link or transfer from your account, follow the prompts to do so and look for a confirmation email.
Your Zoom profile allows you to update your user information, including your name, personal meeting ID, email address, and more. Some of this information is displayed to other users in the account, such as your name, department, and job title. This information can be viewed by other contacts during a meeting or in Team Chat when they view your profile card.
How to access your profile
Profile information and picture section
Your profile picture, display name, pronouns, phone, department, job title, and location are displayed to other users when they hover over your profile picture in the Zoom desktop app.
Personal section
Meeting section
Account section
Sign In section
Others section
Calendar and Contacts Integration: Set up or change calendar and contacts integration with Google, Office365 or Exchange.
The ![]() padlock icon on your Zoom screen is your assurance that the content of the Zoom meeting you are in is encrypted to provide an added layer of security. This encryption is required for all SUNYOPT Zoom meetings. For technology geeks the encryption is at the application layer using TLS 1.2 with Advanced Encryption Standard (AES) 256-bit algorithm.
padlock icon on your Zoom screen is your assurance that the content of the Zoom meeting you are in is encrypted to provide an added layer of security. This encryption is required for all SUNYOPT Zoom meetings. For technology geeks the encryption is at the application layer using TLS 1.2 with Advanced Encryption Standard (AES) 256-bit algorithm.
![]()
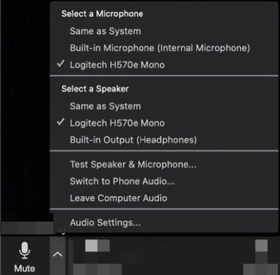
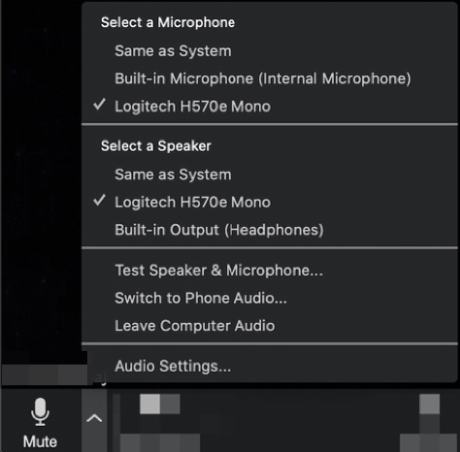
Mute/Unmute Mic – This is your microphone option. You can mute the mic by selecting it. When muted, a red line will show across the Mute button. To expand the menu, click on the arrow next to the Mute button.
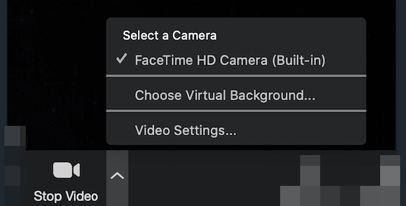
Stop/Start Video – This is your camera. To stop showing your camera you can click on it and a red line will show across. If you click on the arrow next to Stop Video, you’ll see the video menu, including Virtual Backgrounds.
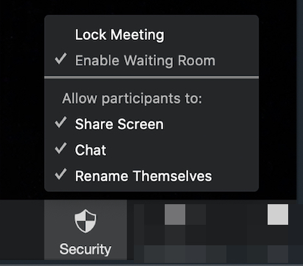
Security – This is where you can lock your meeting when everyone has joined or change other permissions.

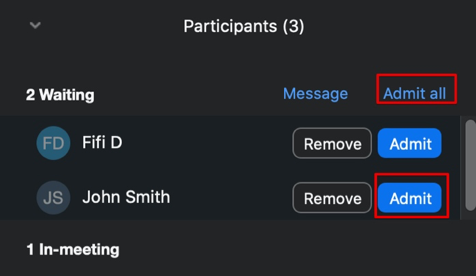
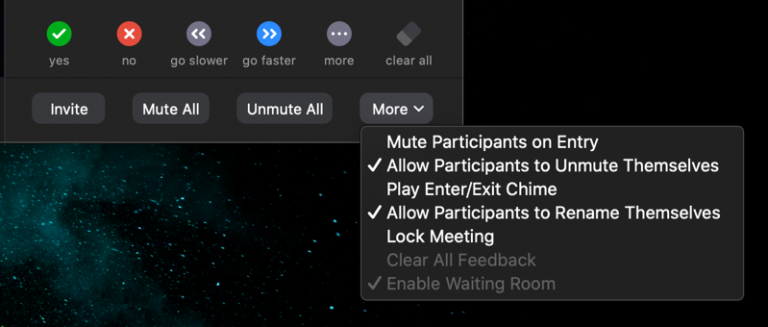
Participants – If you click on the Participants button, a window will open up to the right of your screen and it will display anyone that has joined. If they haven’t joined, they would be in the waiting room, and you can admit them all, or one at a time.
When in participants window, you also have the menu options below by clicking on More.

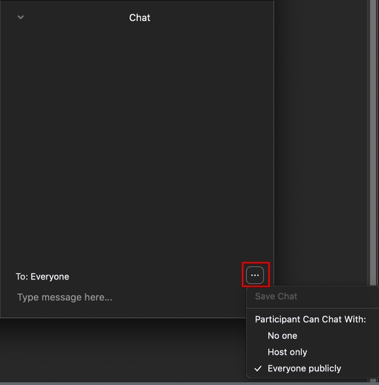
Chat – In order to chat with the participants, you’ll need to click on the Chat Button. Click on the 3 dots to expand the chat menu.
Share Screen – Click on Share screen to share the screen of your choice. You can select to share your main screen, or a selective one, such as the white board or a PowerPoint Presentation. If you’re playing a video with sound, please check the box next to: Share Computer sound before clicking on the Share button.

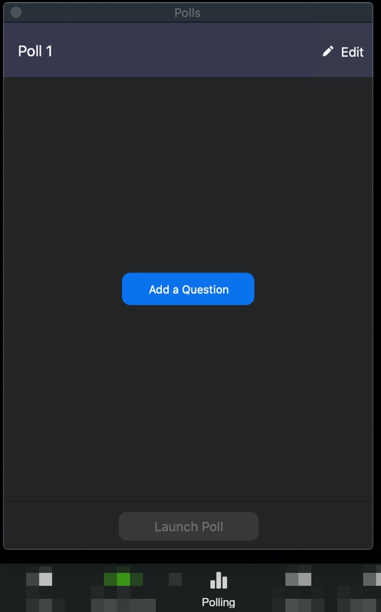
Polling – If you want to create polls, you can click on Polling Button as start adding Questions. The polling feature for meetings allows you to create single choice or multiple-choice polling questions for your meetings. You will be able to launch the poll during your meeting and gather the responses from your attendees. You also have the ability to download a report of polling after the meeting.
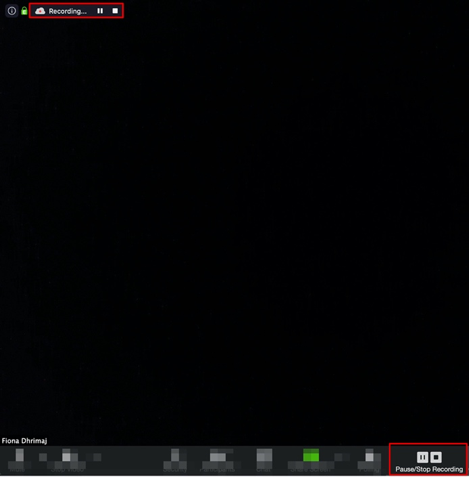
Recording – All Zoom recordings are saved to your Zoom cloud account, and if you have an account in Panopto, they’re moved to your “My Folder” as well under “Meeting Recordings” To start a recording just click on the Record Button. You have the option to Pause and Stop it at any time. You’ll know it’s recording, as you’ll see a red dot in a cloud on top right of your screen and also the word Recording next to it.
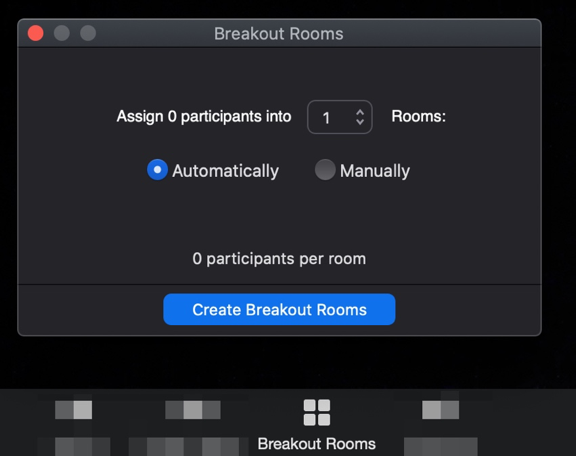
Breakout Rooms – Breakout rooms allow you to split your Zoom meeting in up to 50 separate sessions. The meeting host can choose to split the participants of the meeting into these separate sessions automatically or manually and can switch between sessions at any time. Note: You can only pre-assign participants in a breakout room if you know for certain they have a zoom account, otherwise, you can only add them manually once they’ve joined the zoom meeting.
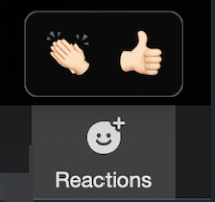
Reactions – Meeting participants can now react during a meeting by sending a thumbs up or clapping to communicate without interrupting the meeting. Reactions will disappear after 5 seconds. By default, the meeting reactions have a yellow skin tone. On the Zoom Desktop Client for Windows and Mac, you can also set your skin tone.

Mute/Unmute Mic – This is your microphone option. You can mute the mic by selecting it. When muted, a red line will show across the Mute button. To expand the menu, click on the arrow next to the Mute button.
Stop/Start Video – This is your camera. To stop showing your camera you can click on it and a red line will show across. If you click on the arrow next to Stop Video, you’ll see the video menu, including Virtual Backgrounds
Security – This is where you can lock your meeting when everyone has joined or change other permissions.

Participants – If you click on the Participants button, a window will open up to the right of your screen and it will display anyone that has joined. If they haven’t joined, they would be in the waiting room, and you can admit them all, or one at a time.

When in participants window, you also have the menu options below by clicking on More.
Polling – If you want to create polls, you can click on Polling Button as start adding Questions. The polling feature for meetings allows you to create single choice or multiple-choice polling questions for your meetings. You will be able to launch the poll during your meeting and gather the responses from your attendees. You also have the ability to download a report of polling after the meeting.

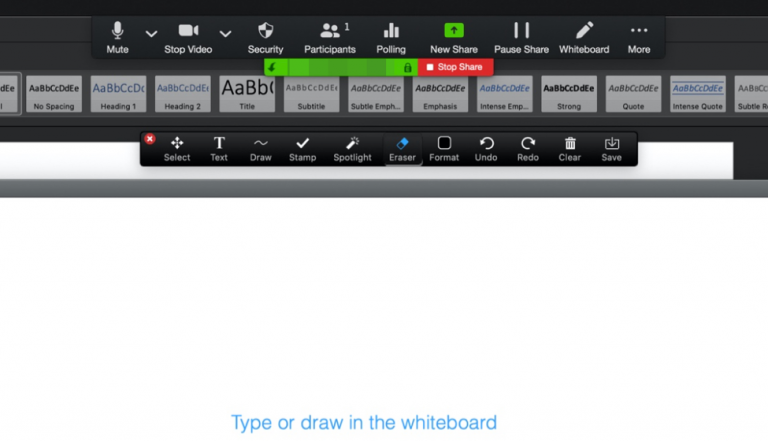
New Share – You can click on this button to change the screen that you’re currently sharing. If you’re done with the PowerPoint and you’d like to share the whiteboard, this is where you would go to change it.

You can collaborative annotate on the Whiteboard as long as you have not disabled the participants from annotating from the More Menu above.
Pause Share – You can Pause your screen share by clicking this button. When you’re ready, just hit Resume Share.

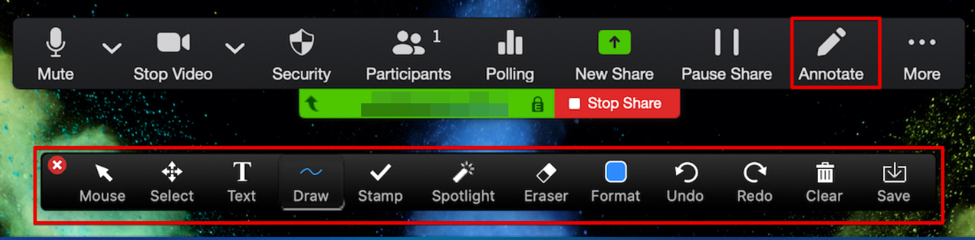
Annotate – Meeting participants can annotate on a shared screen as a viewer or the one that started sharing your screen. You can also use annotation tools when sharing or viewing a whiteboard.
Remote Control – The remote-control feature allows you to take control of another participant’s screen in a meeting. You can either request remote control of another participant’s screen or the other participant can give control to you. That is if this option has been enabled under Settings.
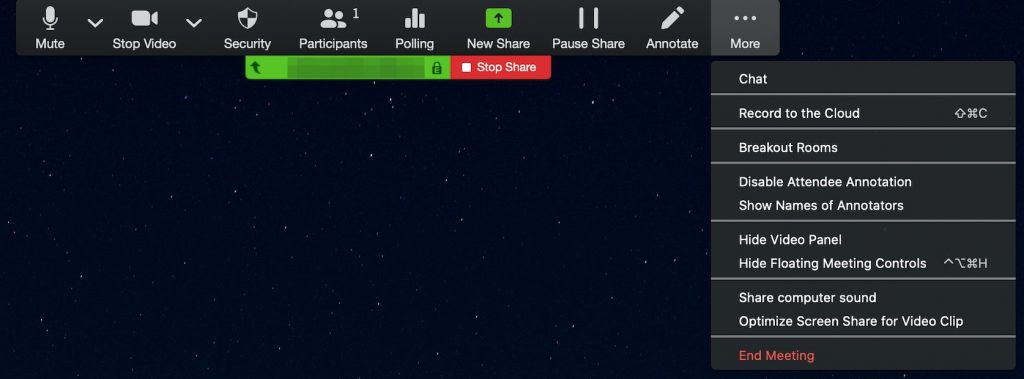
More – When you start sharing your screen, the meeting controls will move into a menu that you can drag around your screen.
1. Open your Office 365 web calendar and click New Event to create a new calendar event.
2. Enter meeting details like the title, location, and attendees.
3. Click the three dots in the top toolbar or the Zoom icon. You will see the Zoom sidebar open, prompting for your Zoom credentials.
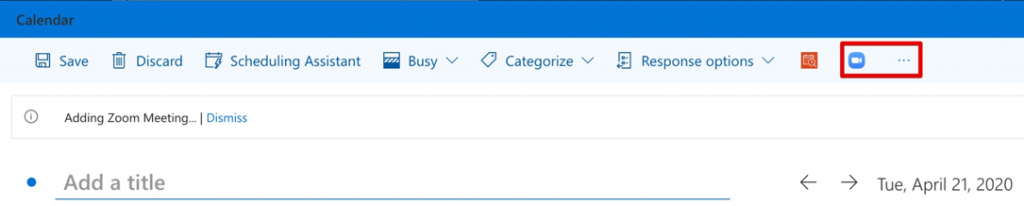
4. Click Zoom
5. Click Add a Zoom Meeting
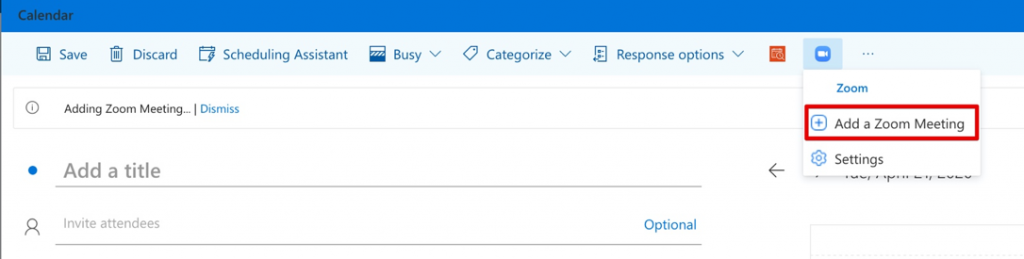
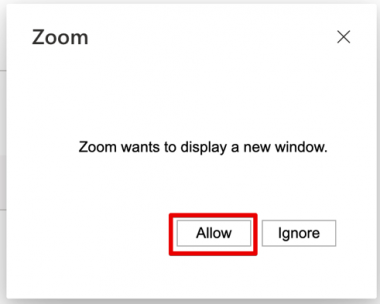
6. Sign in to your Zoom account. You might first be asked to Allow Zoom to open a new window, please select Allow.
7. Enter your Zoom in Credentials to Sign in.
8. If you are already signed in to the Zoom web portal or the Zoom Desktop App, it will log you in automatically, so you won’t need to complete Step 6 & 7.
Note: The meeting settings will automatically populate with your default settings found in your Zoom web portal in My Meeting Settings.
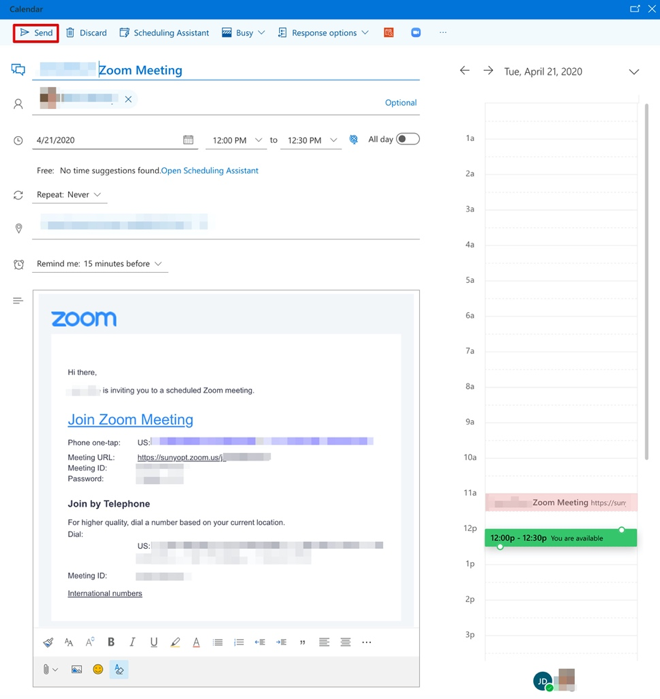
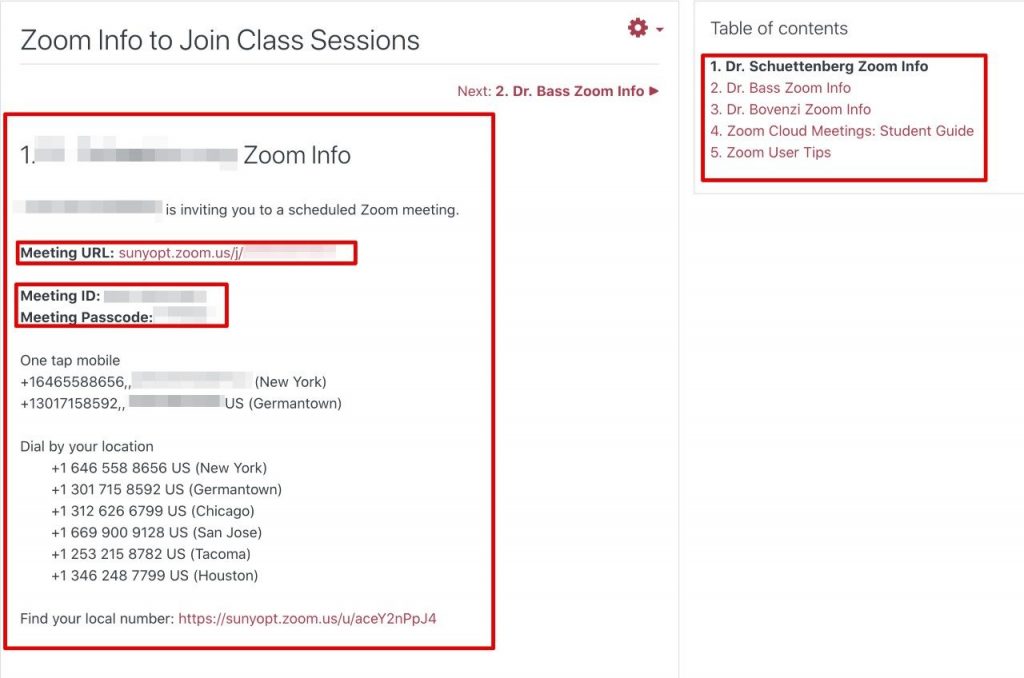
9. Once you select, Add a Zoom Meeting, the meeting info will be displayed in the description area. When ready, click on Send and the attendees you added to the calendar invite will receive the below invite with meeting URL, ID, Password and Call In Numbers. Once they RSVP, the Zoom info will be within the calendar invite when they’re ready to join the meeting.
Please follow these steps to play a pre-recorded video during a live Zoom meeting:
1) Open the video you want to play. If the video is on a website (e.g., YouTube), go to the site in your browser. If the video is saved to your device (e.g., an MP4 file saved on your computer), open the video.
2) Log into your Zoom account.
3) When you are ready to play the video, click the Share Screen button on your Zoom control panel.

4) Select the video from the menu of options in the “Select a window or an application that you want to share” box.
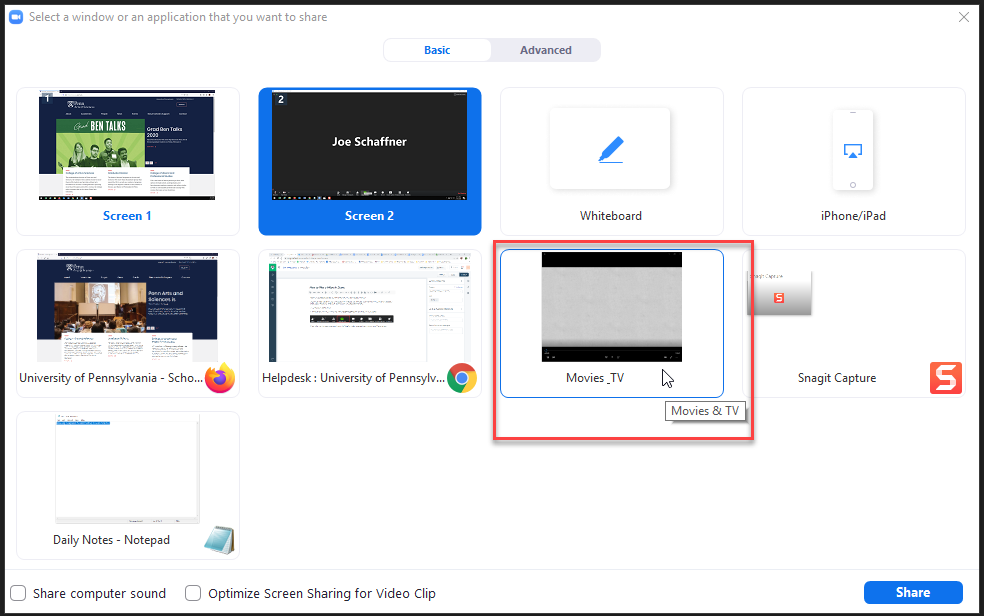
5) Enable the “Share computer sound” and “Optimize Screen Sharing for Video Clip” setting. Then, click Share.
![]()
6) Play the video.
7) When the video ends, click the Stop Share button.

Additional Support:
If you find that the sound is not working when you share a video, please make sure that you have checked the boxes to enable sharing of computer sound in step 5 listed above.
If you have another specific question concerning zoom, please refer to Zoom’s Help Center here.
Usage Reports: Zoom Usage Reports provide insights into meetings hosted, including details on participants and meeting durations. Follow these steps to access the reports:
1. Sign In: Navigate to the Zoom web portal and log in to your account.
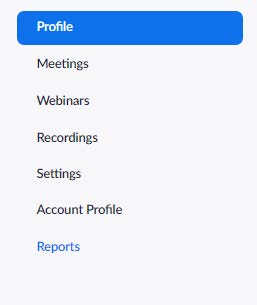
2. Navigate to Reports: Select “Reports” located at the bottom of the left-hand menu.
3. Select Report Type: Click on “Usage” to view statistics for past meetings.

4. Set Time Frame: Adjust the date range at the top to match the period of your meetings.
5. If the meeting you want to take atendance for is not listed below, you will need to change the dates and select search to find it.
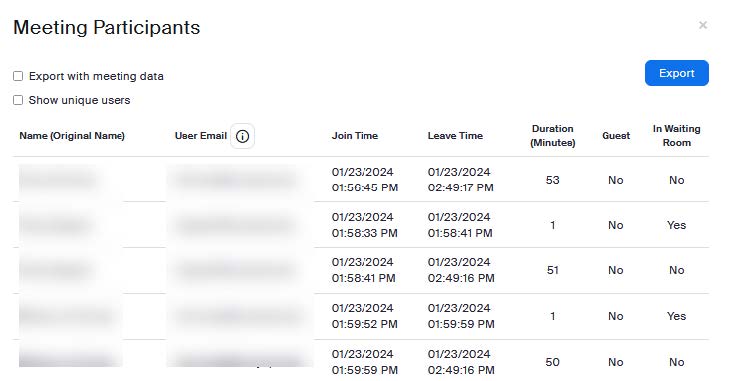
6. View Meeting Details: A list of past meetings will appear. Click on the blue number under “Participants” to see detailed information about attendees and meeting duration.
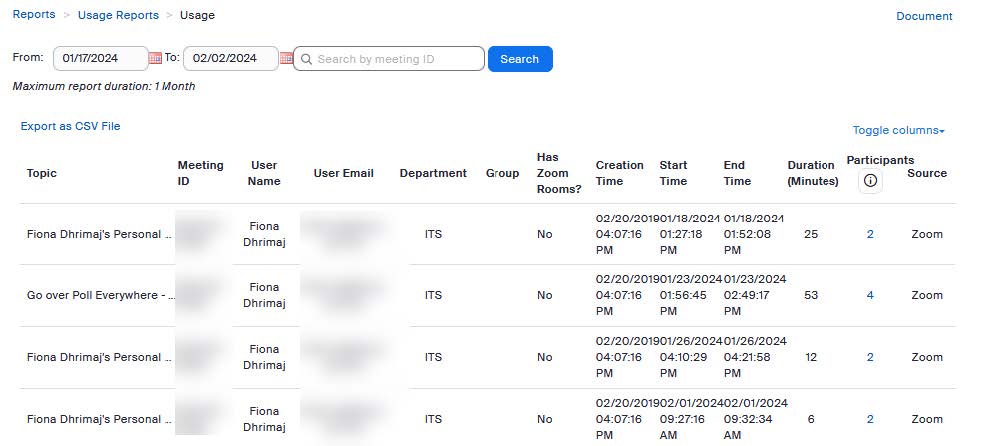
7. Exporting Reports: To download the data, click the “Export” button located at the top right corner of the screen. This will allow you to save the information as an Excel file, with sensitive information like names and email addresses omitted for privacy.
Please see below a preview of the Excel file (with the names and email addresses removed).

The Zoom control bar is normally useful to have at hand especially when lecturing however, if you are sharing your entire screen it can be useful to disable it so that viewers can see your entire screen.
There are two ways to do that, one way is to hide it every time during each meeting, and the other way is a permanent way. I’ve shown steps for both options below.
The Permanent Option
1. Log in to your Zoom on the web and go to Settings, followed by In Meeting (Basic)
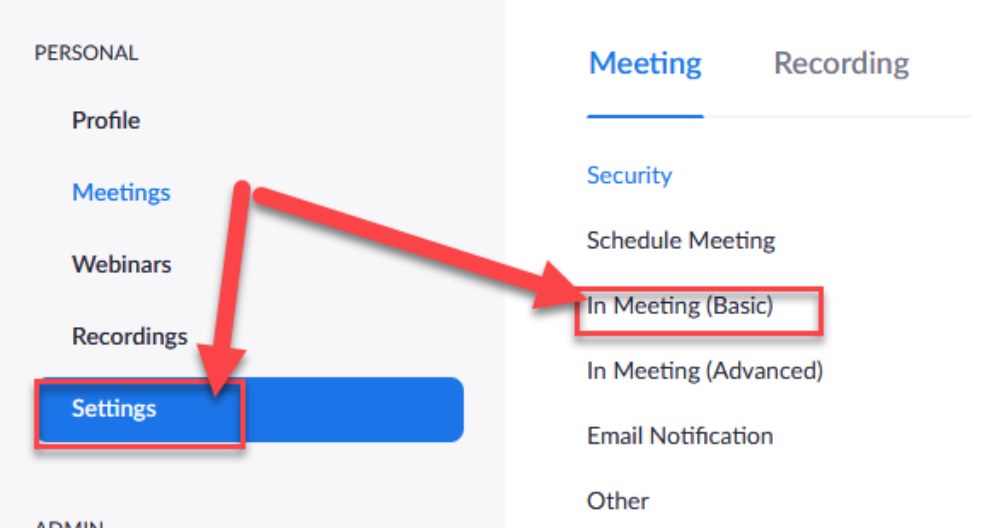
2. Scroll down until you see Always show meeting control toolbar. If it is blue and On, click on it to turn it off.

3. Once you make this change, you’ll need to log out of the Zoom Desktop Client and back on in order for the changes to take effect.
4. When you start your next Zoom Meeting and Share your Screen, you’ll only see the below bar minimized on top. The recording does not capture the menu, it’s only for you to see.

Temporary Option (Has to be done in every meeting)
If you don’t want to go with the permanent solution, you can choose to hide the Menu Bar during a screen share by following the below steps.
When sharing your screen, the floating control bar moves from the bottom of the page to the very top.

1. In your Zoom meeting, click More in the meeting control.

2. Click Hide Floating Meeting Controls. Your Meeting Controls will then be hidden.
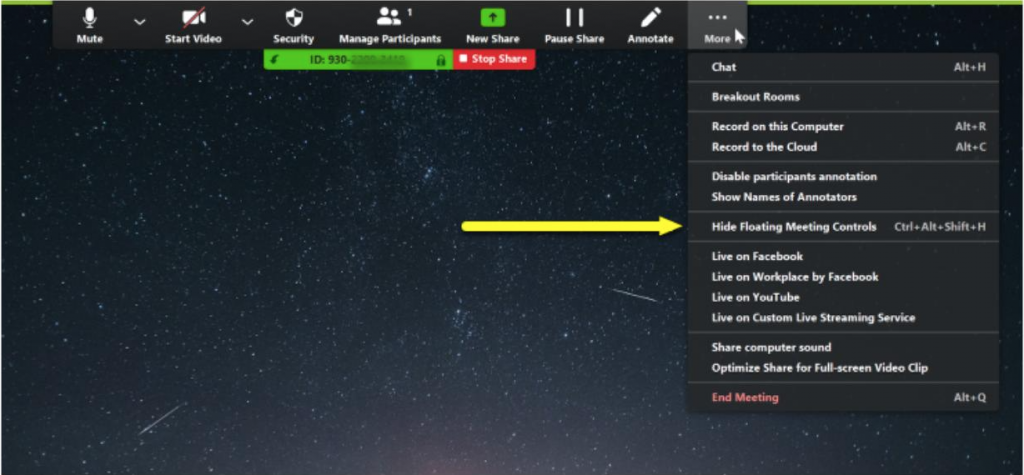
3. To bring back your Meeting Controls, press the ESC key on your keyboard.
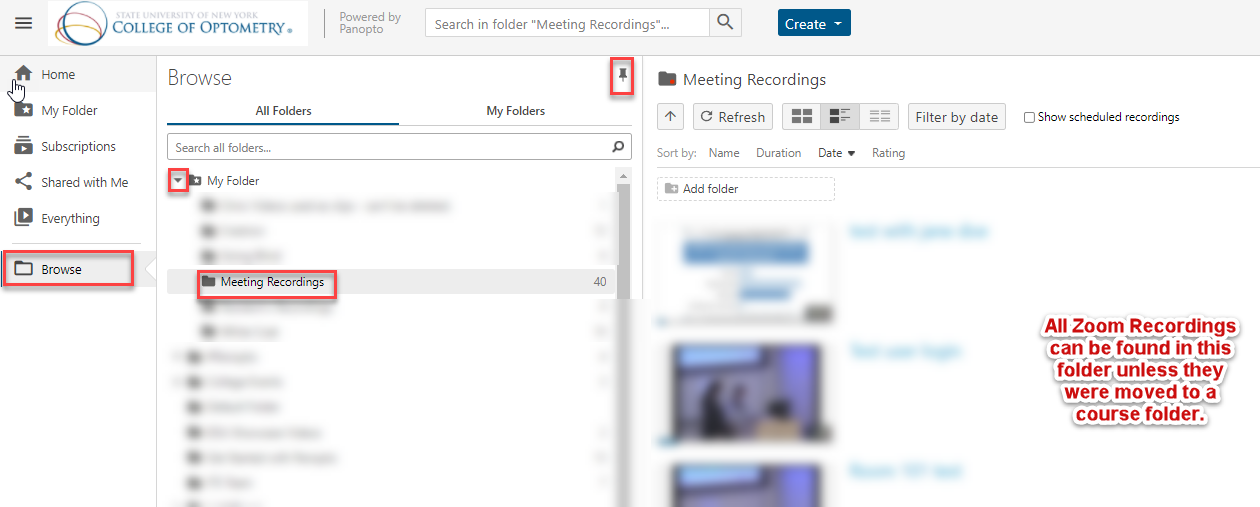
When recording your Zoom meetings to the cloud, you are utilizing a university-wide storage space that is very limited. Because of that, we have connected Zoom with Panopto, so you never have to lose any of your recordings. All Zoom recordings have been set to auto-delete after 30 days, with the exception of lectures, which we delete the same week.
All recordings will be in your Panopto Folder regardless, the only thing you might need from Zoom before deleting is different views (if you don’t like the view in Panopto), the rest of the info can be found in Panopto.
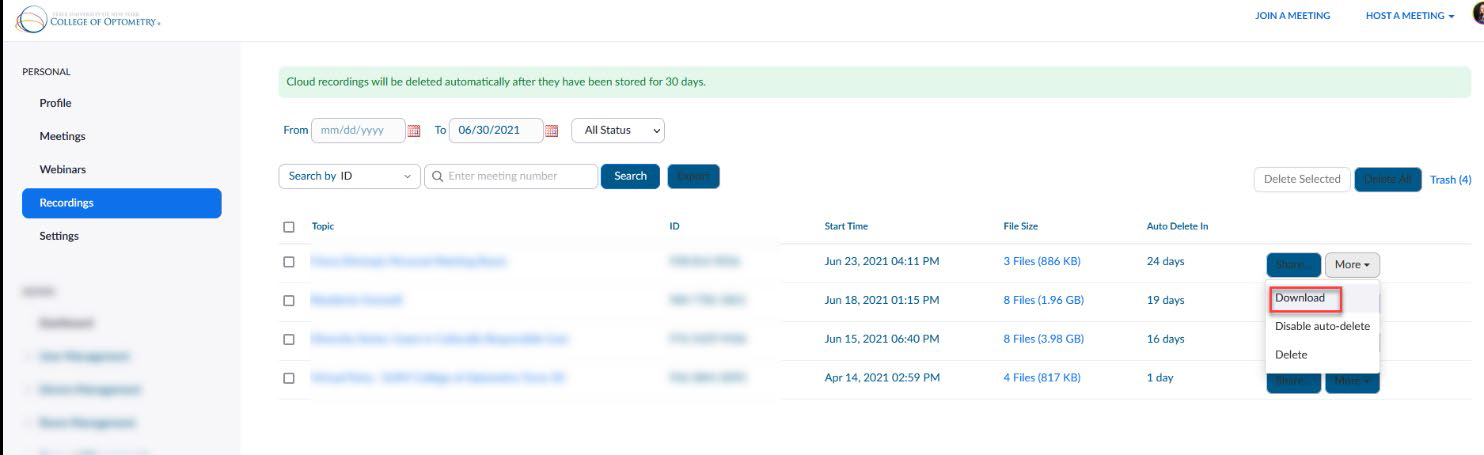
Note: The downloads will include audio, video, and chat history files which you can open with a text editor such as notepad.
If you’d like to save the individual file types such as Speaker View, Gallery View, Audio Transcript, Audio Only, etc., please click on the name of the recordings and individually download each file before deleting the recordings.
File types
Alternate File Storage Options:
Once you have saved your files (if needed) to another location, you may safely select “Delete” to remove the recordings for each meeting from the Zoom Cloud Recording storage area.
All Zoom Cloud Recordings are automatically saved in Panopto (our lecture capture software). If you remove your Cloud Recording in Zoom it will not remove it from Panopto. Wait at least a day or two before deleting any Zoom recordings, as it takes hours for the entire recording to fully upload to Panopto.
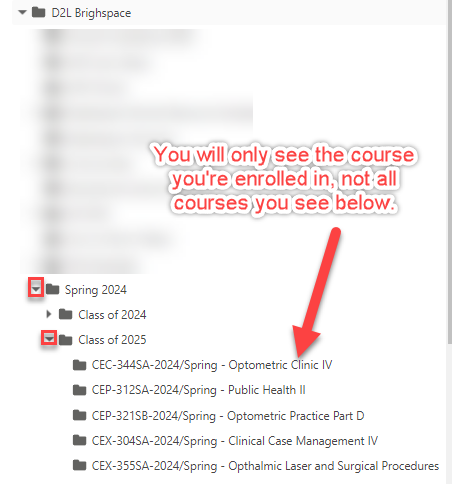
All lecture recordings are moved by the Media Department to their respective folders, so you won’t find them in your personal meetings folder.
To View your Zoom Cloud Recordings in Panopto

If you’d like to share a link to your Panopto recordings, please see below what options are available.
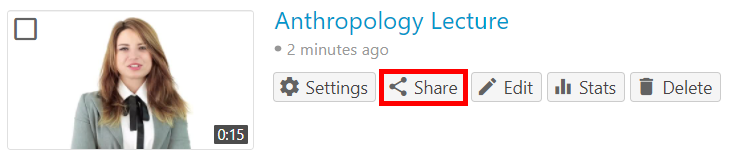
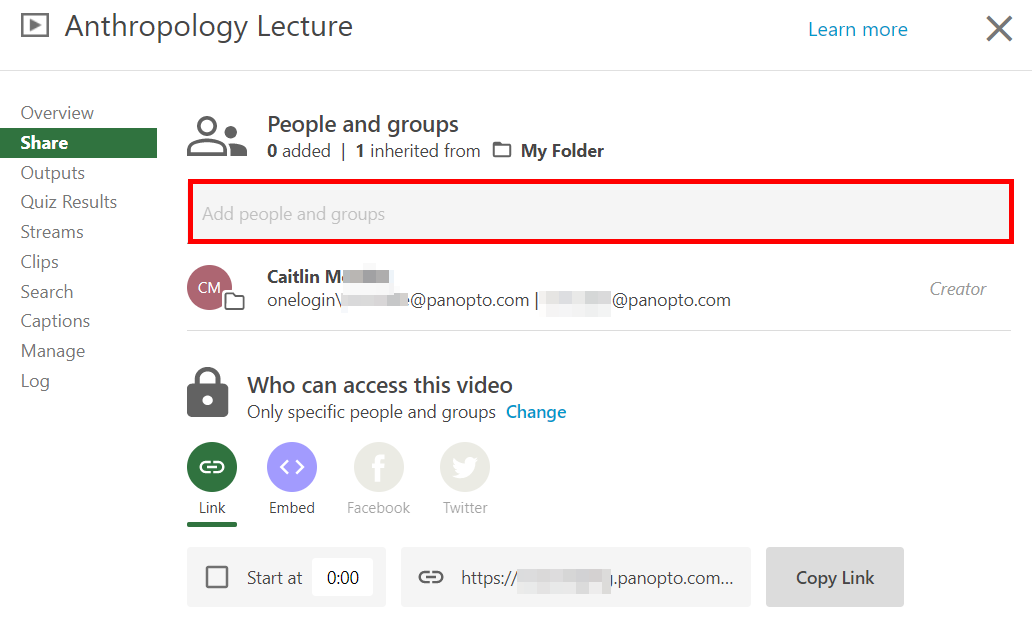
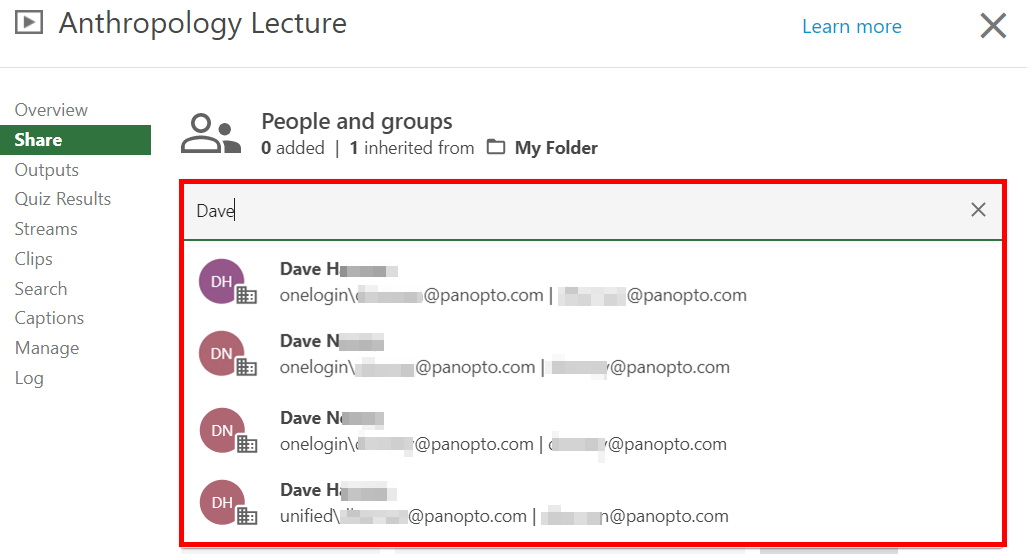
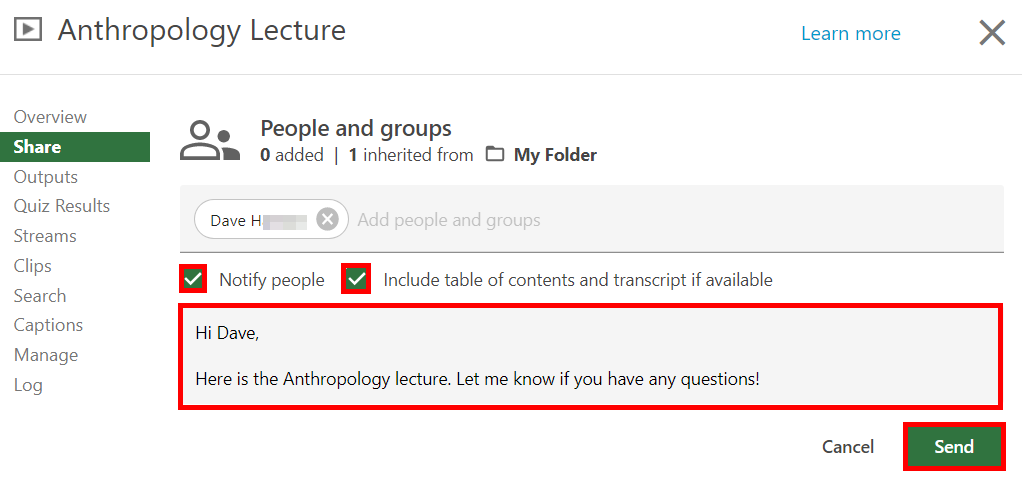

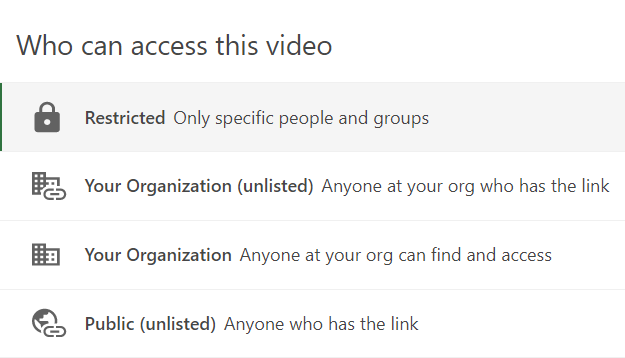
You can also share the video with a wider audience. Select Change from under Who can access this video to change the sharing option. A pop-up list will appear with the following sharing. Note: a video inherits sharing permissions from its parent folder. A user may adjust this sharing permission to be more public than the parent folder setting, but not more private. Additionally, your administrator can change what sharing options are available to you, so you might not see all of these options.
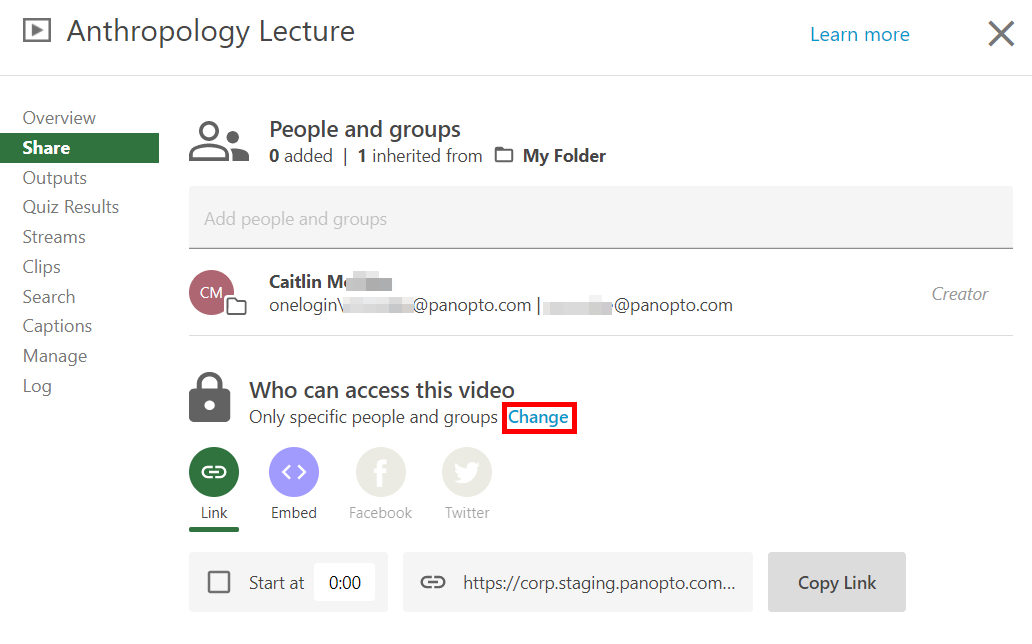
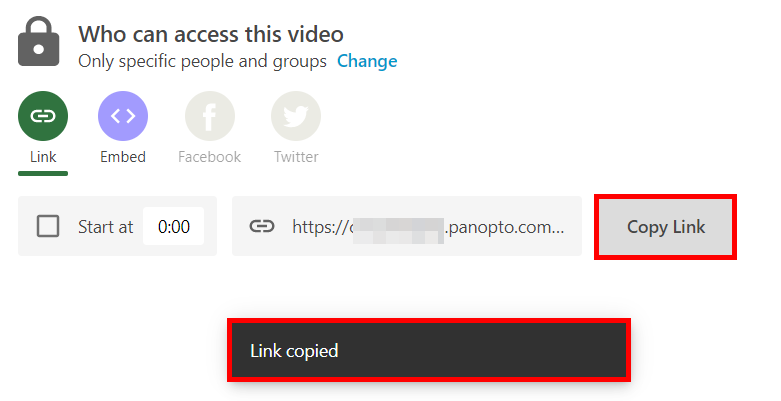
If you have set Who can access this video to any option except Restricted, you can copy and share the link by selecting the Copy Link button that appears. Link copied will appear at the bottom, indicating that you have successfully copied the link. You can paste the link in an email. Optionally, select the checkbox next to Start at and add the timestamp at which you’d like the video to start when the audience opens the link provided.


Starting Point:
Go to the Panopto website: sunyopt.hosted.panopto.com
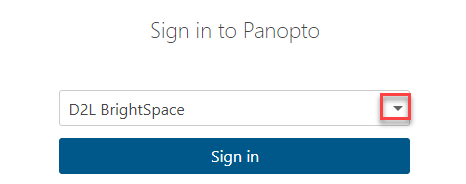
Sign-In Process:
Choose “D2L Brightspace” from the dropdown menu and click on “Sign In“.
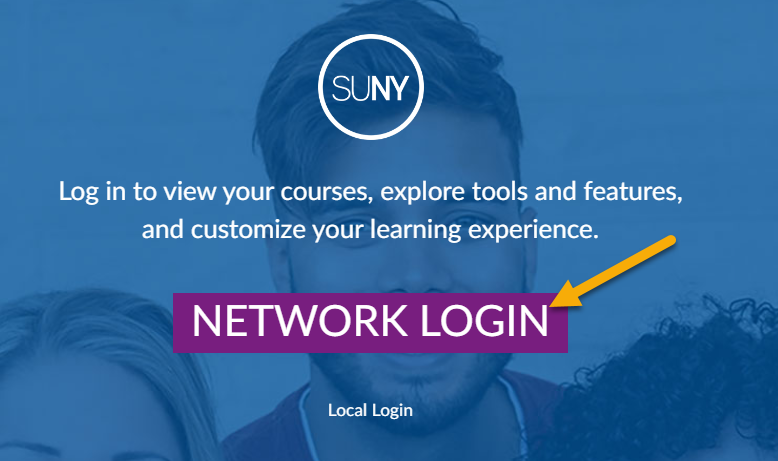
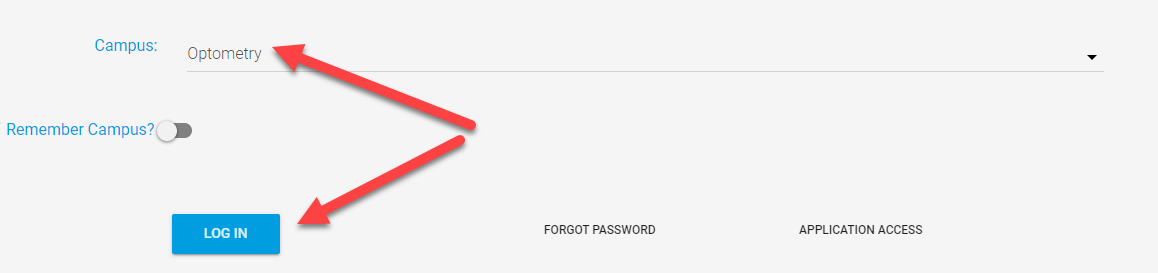
Campus Selection:
Click on “Network Login”. On the following page, locate and select “Optometry” as your campus, then click “Login“.
Accessing Zoom Recordings
Finding Course Recordings:
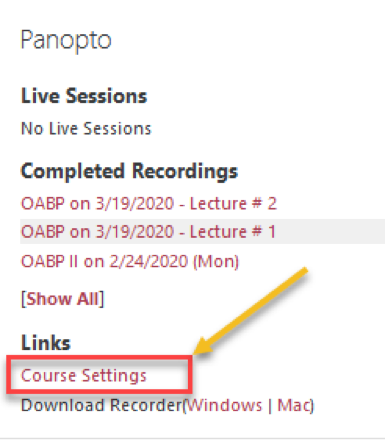
Step 1. Log in to Moodle and navigate to your course. Click on Course Settings in the Panopto Block. I’m using OABP II Course as an example. (I’m assuming the Panopto Application was already installed on your personal laptop, if not, before you move forward with Step 1, please install the Panopto application by choosing Windows or Mac below, depending on what system you have.)

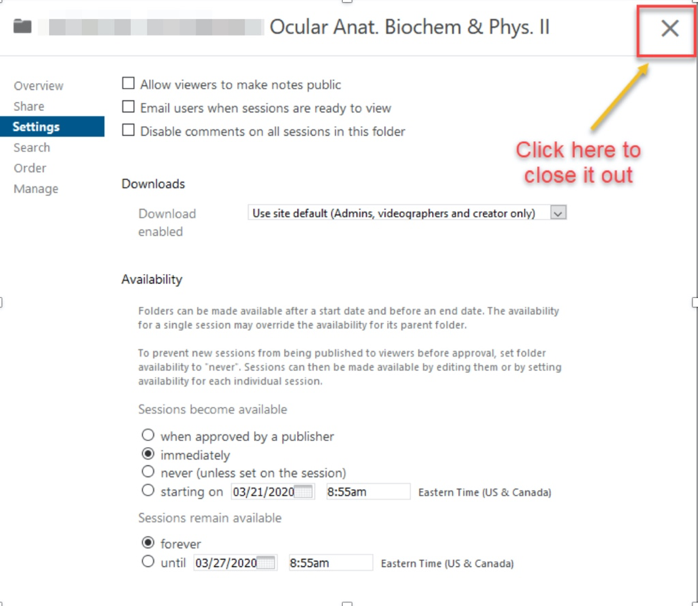
Step 2. Once you click on Course Settings, the below window pops up. You don’t need to make any changes to it, so go ahead and close it out.
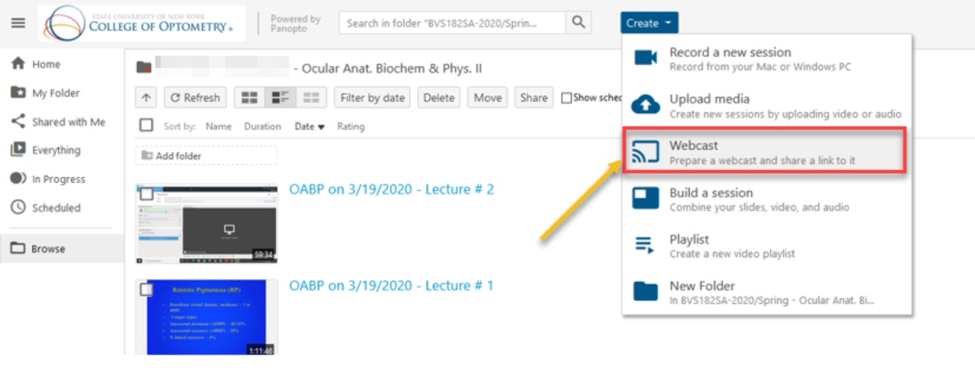
Step 3. Once you close the window, you’ll find yourself on your course page of the Panopto site. To create a Webcast schedule for your upcoming live class, please go to Create and select Webcast.
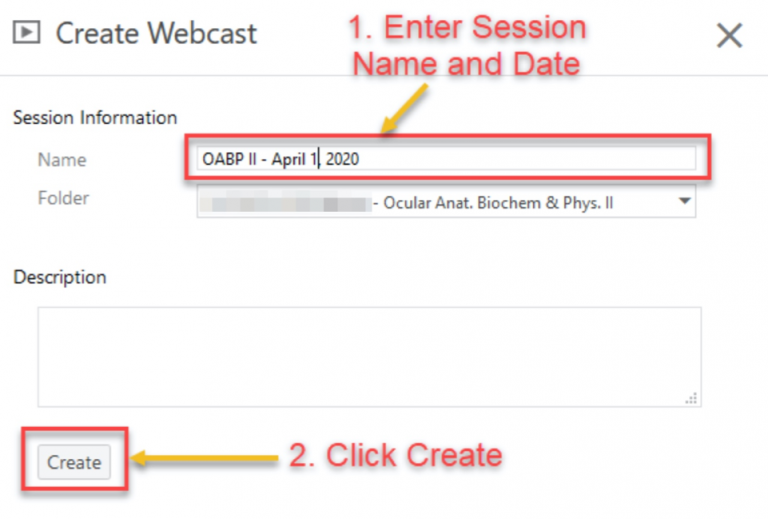
Step 4. When the Webcast window opens, please enter a name and date for your upcoming session. You can include a description if you’d like, followed by Create.
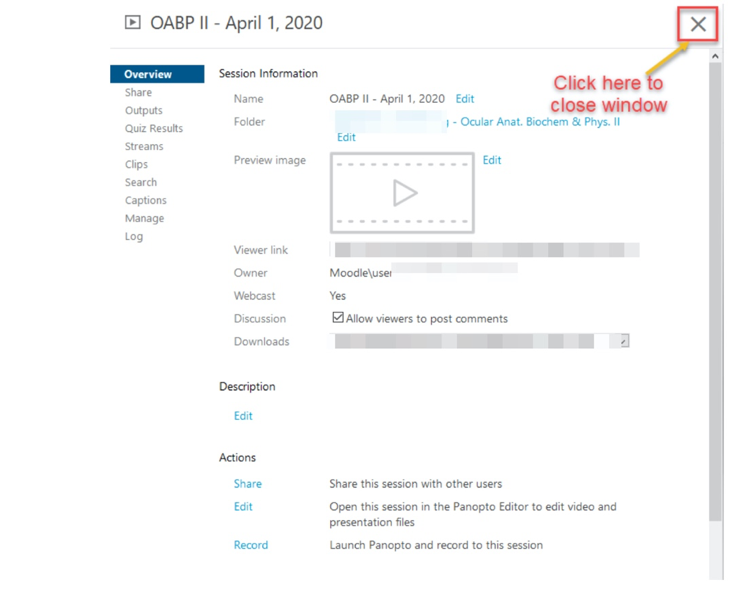
Step 5. No need to make any changes to the window that opens up, so you can go ahead and close it.
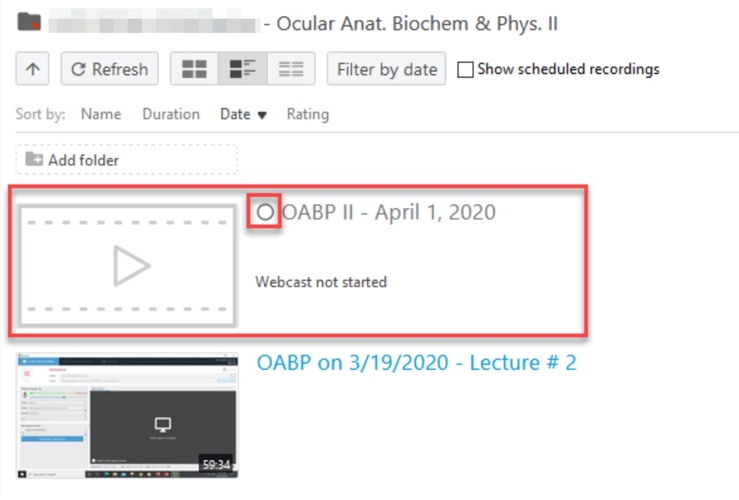
 Step 6. You know you created the webcast schedule correctly because you’ll see it on top of your Panopto Course, and there’s a full empty circle in front of the session name. It also says, “Webcast not started”.
Step 7. Double click on the Panopto App ![]() on your taskbar to open it.
on your taskbar to open it.
I’ve numbered all the steps in the order they need to be performed, this way, you don’t miss anything before you start your live session.
Step 8. Open your PowerPoint, scroll to the slide you’d like to start from, highlight it and minimize it. Now that you’re ready to start your live session tap on the Record button.
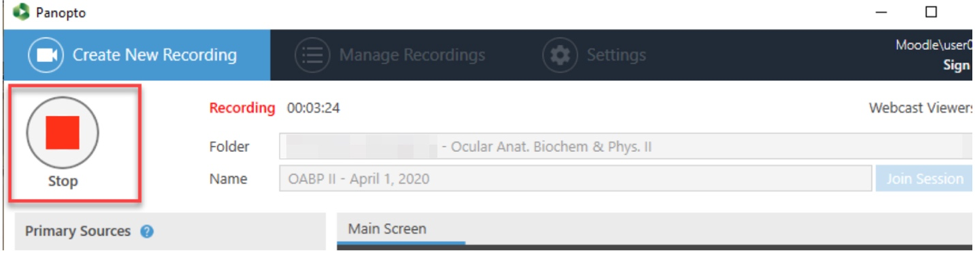
Step 9. Once you hit Record, you’ll see the numbers moving, that means you’re now Live. The Record button turns into Stop button.
Step 10. Open your minimized PowerPoint, click on the Full screen icon at the bottom right and Start Presenting.

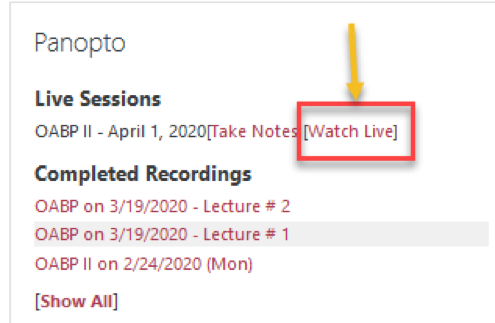
Step 11. Students will now see the below link on their Moodle course, and they’ll click on the Watch Live link to see your screen and hear your audio.

Step 12. When you’re done with your live session, click on Stop, followed by Done.
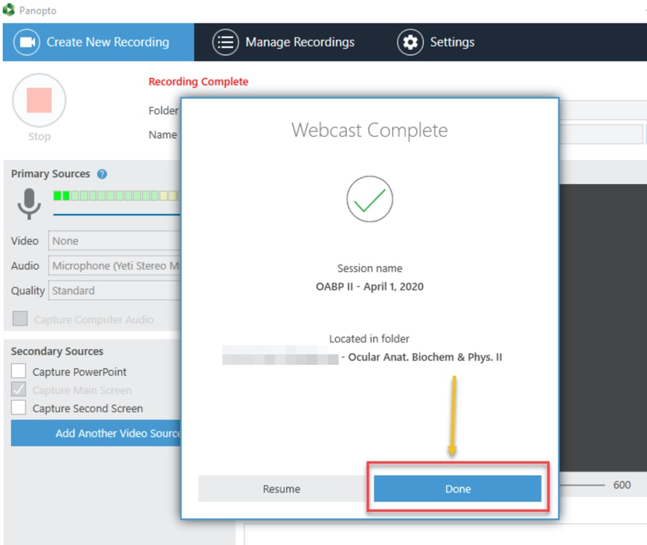
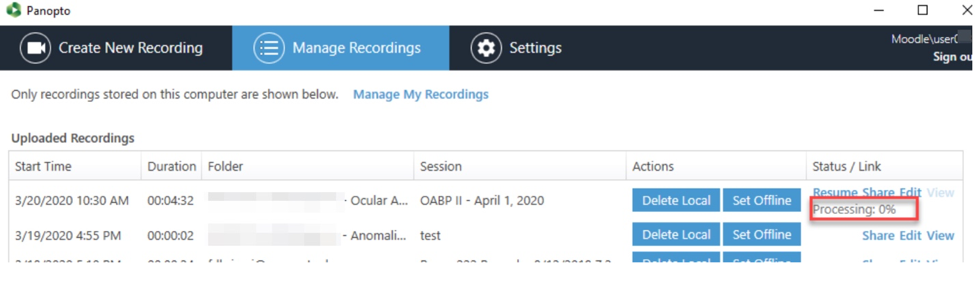
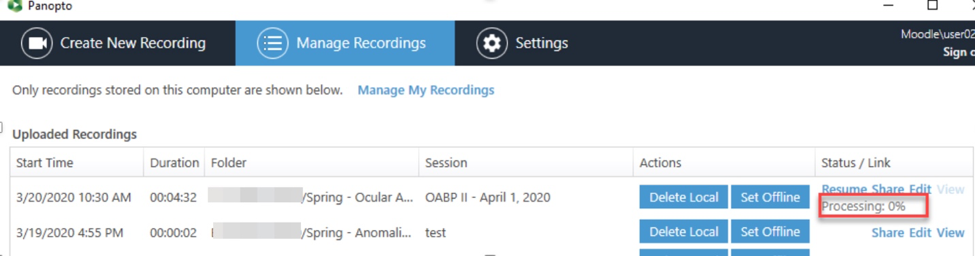
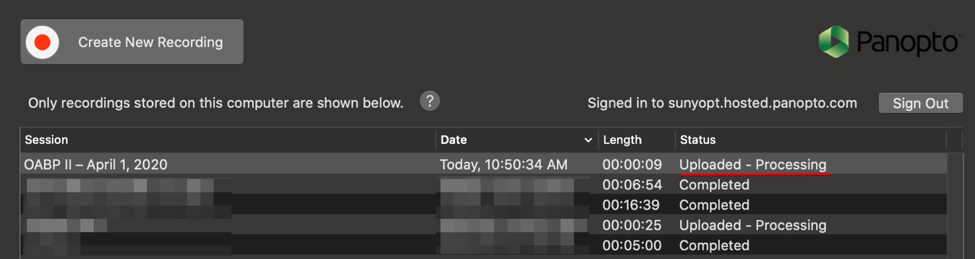
Step 13. After selecting Done, the below window will pop up. Please wait until this link says Uploaded or Processed before you close the Panopto Application, otherwise it won’t load to Moodle. The process does not take longer than 5 minutes.
Step 1. Double click on the Panopto App ![]() on your taskbar to open it.
on your taskbar to open it.
Step 2. Open your PowerPoint, scroll to the slide you’d like to start from, highlight it and minimize it. Now that you’re ready to start your recording, tap on the Record button.
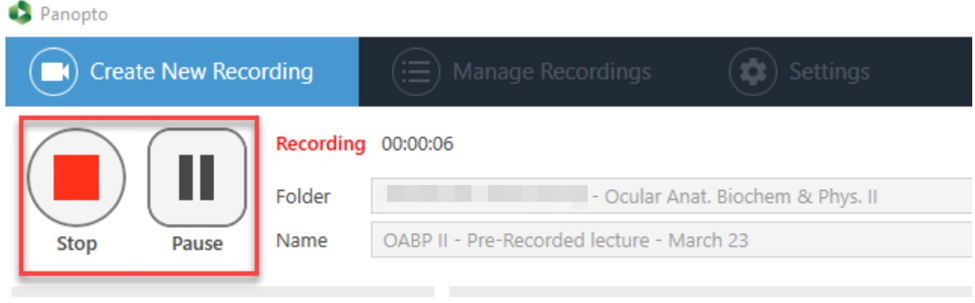
Step 3. Once you tap the Record button, you’ll see the numbers moving, that means you’re now recording. The Record button turns into Stop and you’ll also see a Pause Button.
Step 4. Open your minimized PowerPoint, click on the Full screen icon at the bottom right and Start presenting.

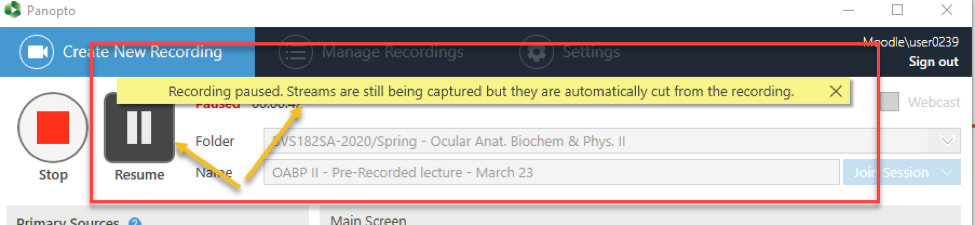
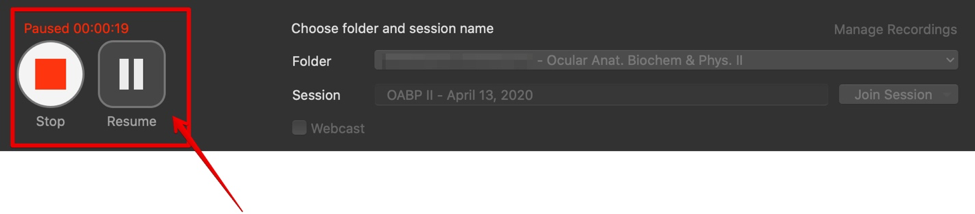
Step 5. If you need to take a break, you can tap on the Pause button. Once you’re ready to resume tap on the Resume button.
Step 6. When you’re done with your recording, click on Stop, followed by Done. If you were not satisfied with the recording at all, you can Delete and record again.
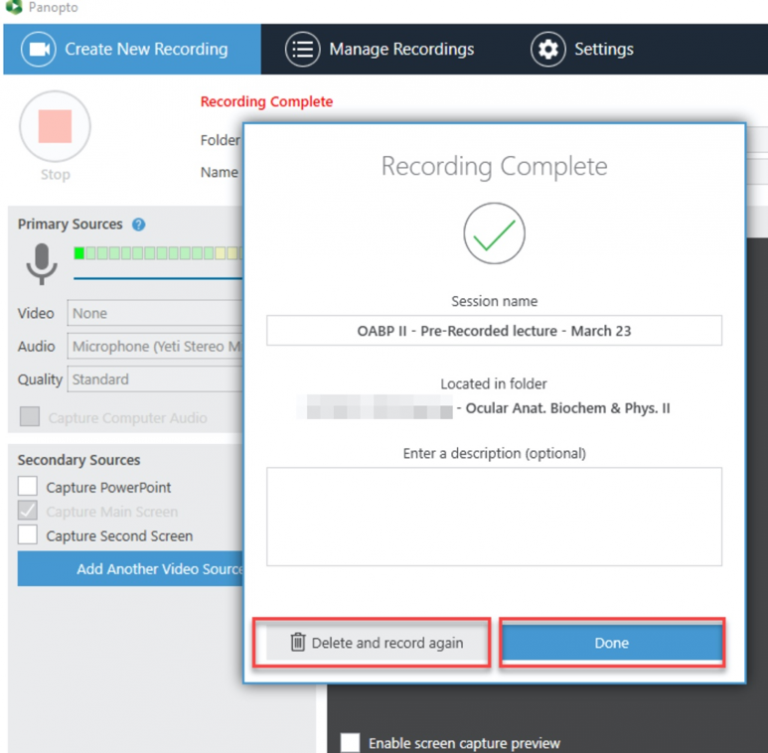
Step 7. After selecting Done, the below window will pop up. Please wait until this link says Uploaded or Processed before you close the Panopto Application, otherwise it won’t load to Moodle. This process takes no longer than 5 minutes.
That’s your last step. You can now close application when done or Create a New Recording.
Step 1. Log in to Moodle and navigate to your course. Click on Course Settings in the Panopto Block. I’m using OABP II Course as an example. (I’m assuming the Panopto Application was already installed on your personal laptop, if not, before you move forward with Step 1, please install the Panopto application by choosing Windows or Mac below, depending on what system you have.)
Step 2. Once you click on Course Settings, the below window pops up. You don’t need to make any changes to it, so go ahead and close it out.

Step 3. Once you close the window, you’ll find yourself on your course page of the Panopto site. To create a Webcast schedule for your upcoming live class, please go to Create and select Webcast.

Step 4. When the Webcast window opens, please enter a name and date for your upcoming session. You can include a description if you’d like, followed by Create.

Step 5. No need to make any changes to the window that opens up, so you can go ahead and close it.

Step 6. You know you created the webcast schedule correctly because you’ll see it on top of your Panopto Course, and there’s a full empty circle in front of the session name. It also says, “Webcast not started”.

Step 7. Double click on the Panopto App on your Mac ![]() to open it.
to open it.
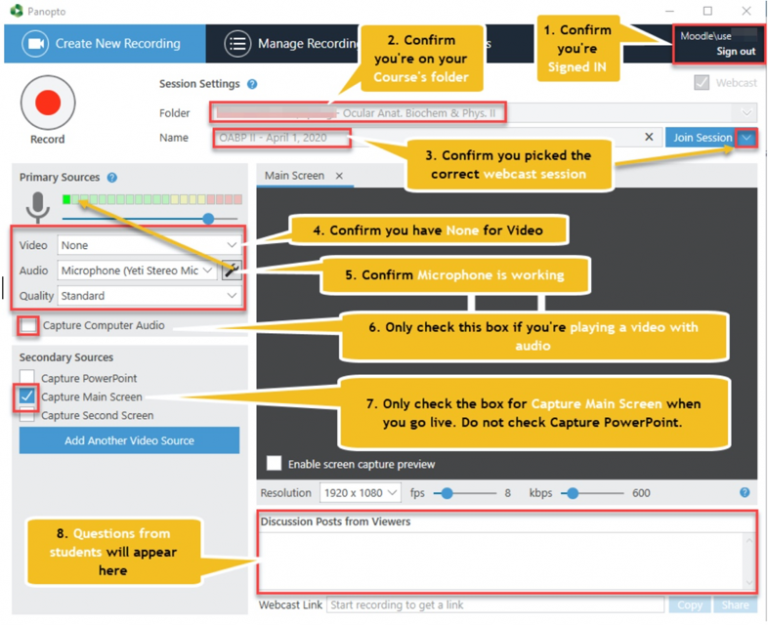
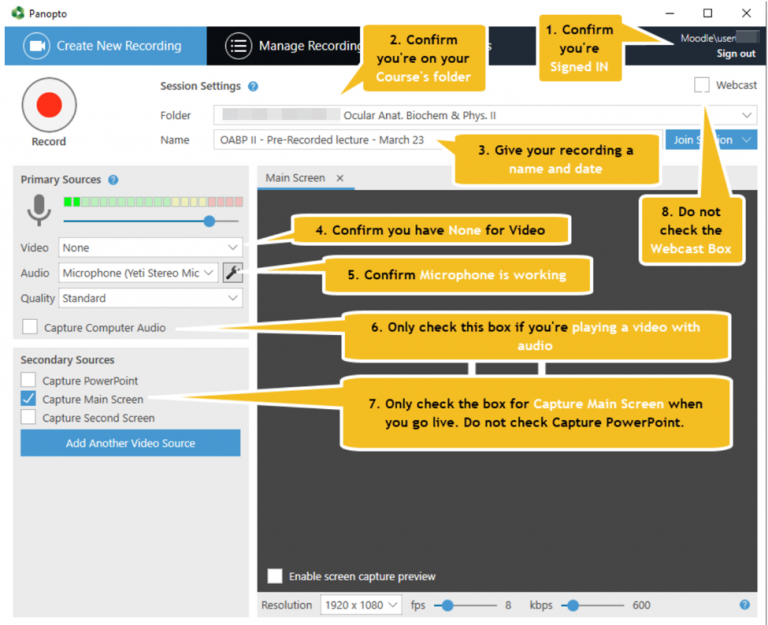
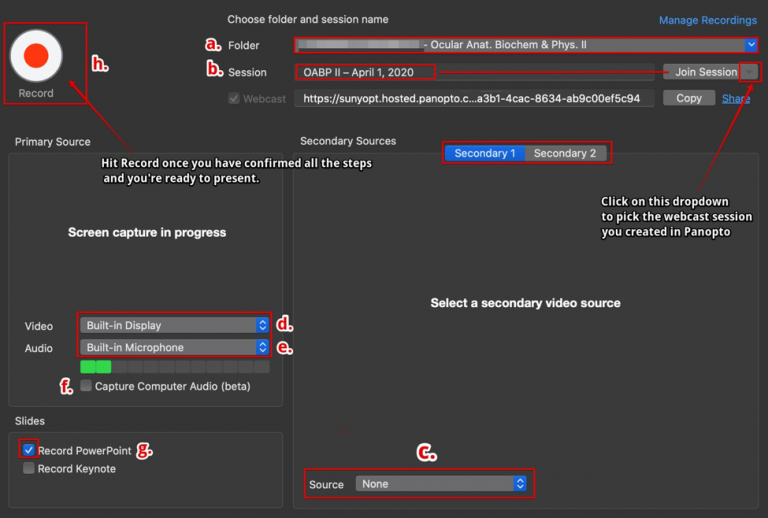
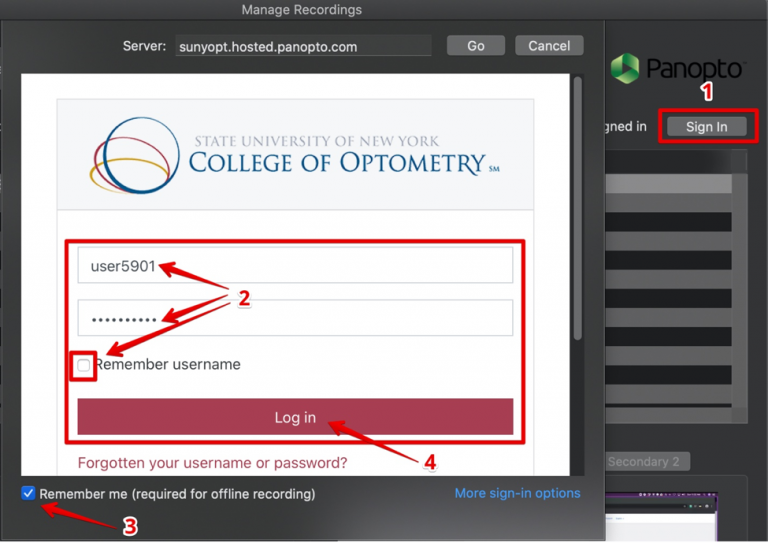
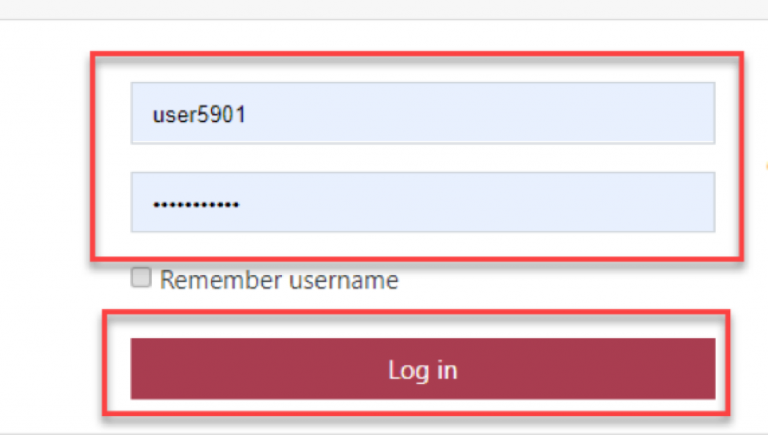
1. Confirm you’re Signed in. 1) Click on Sign in, pick Moodle from the dropdown, 2) Enter your Moodle credentials, check the box to Remember username and 3) Remember me (required for offline recordings). When done, 4) Click on Log in.

2. You know you’ve signed in properly when you see the below message. When ready to start your live recording, click on Create New Recording.

3. You’ll now find yourself on the main Panopto Window. Please confirm the below steps before you start your live lecture:
Step 8. Once you hit Record, you’ll see the numbers moving, that means you’re now Live. The Record button turns into Stop button.

Step 9. Open your minimized PowerPoint, click on the Full screen icon at the bottom right and Start Presenting.

Step 10. Students will now see the below link on their Moodle course, and they’ll click on the Watch Live link to see your screen and hear your audio.
Step 11. When you’re done with your live session, click on Stop, followed by Done.
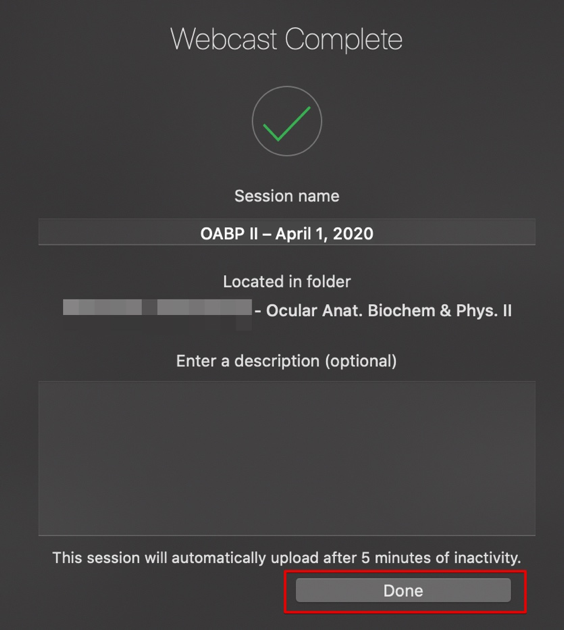
Step 12. After selecting Done, the below window will pop up. Please wait until this link says
Uploaded – Processing before you close the Panopto Application or start a new Recording or Live session, otherwise it won’t load to Moodle. The process does not take longer than 5 minutes.

Step 1. Double click on the Panopto App on your Mac ![]() to open it.
to open it.
1. Confirm you’re Signed in. 1) Click on Sign in, pick Moodle from the dropdown, 2) Enter your Moodle credentials, check the box to Remember username and 3) Remember me (required for offline recordings). When done, 4) Click on Log in.
2. You know you’ve signed in properly when you see the below message. When ready to start your recording, click on Create New Recording.

3. You’ll now find yourself on the main Panopto Window. Please confirm the below steps before you start your recording:

Step 2. Once you tap the Record button, you’ll see the numbers moving, that means you’re now recording. The Record button turns into Stop and you’ll also see a Pause Button.

Step 3. Open your minimized PowerPoint, click on the Full screen icon at the bottom right and Start Presenting.

Step 4. If you need to take a break, you can tap on the Pause button. Once you’re ready to resume tap on the Resume button.
Step 5. When you’re done with your recording, click on Stop, followed by Upload. If you are not satisfied with the recording, you can Delete and record again.
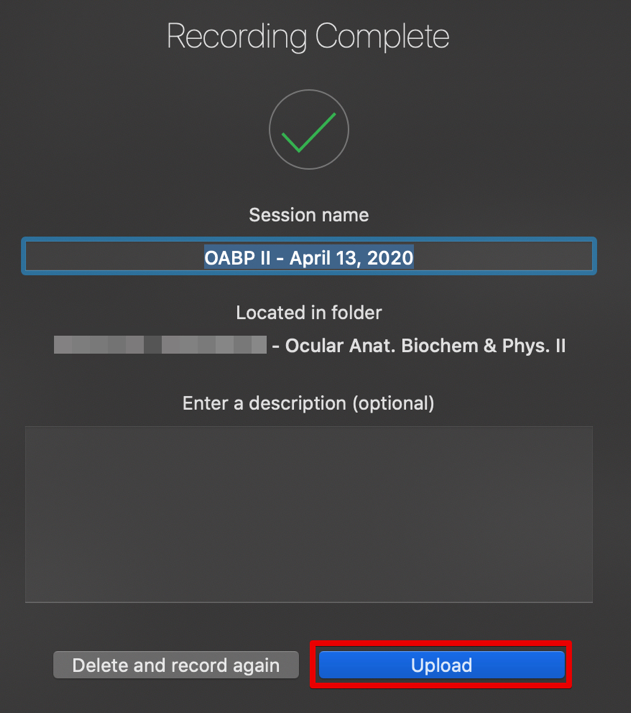
Step 6. After selecting Upload, the below window will pop up. Please wait until this link says Uploaded – Processing before you close the Panopto Application or start a new Recording, otherwise it won’t load to Moodle. The process does not take longer than 5 minutes.
1. Log in to Panopto Web Portal: sunyopt.hosted.panopto.com
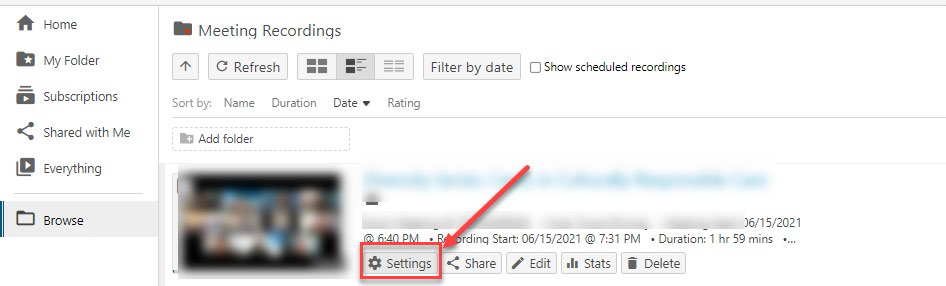
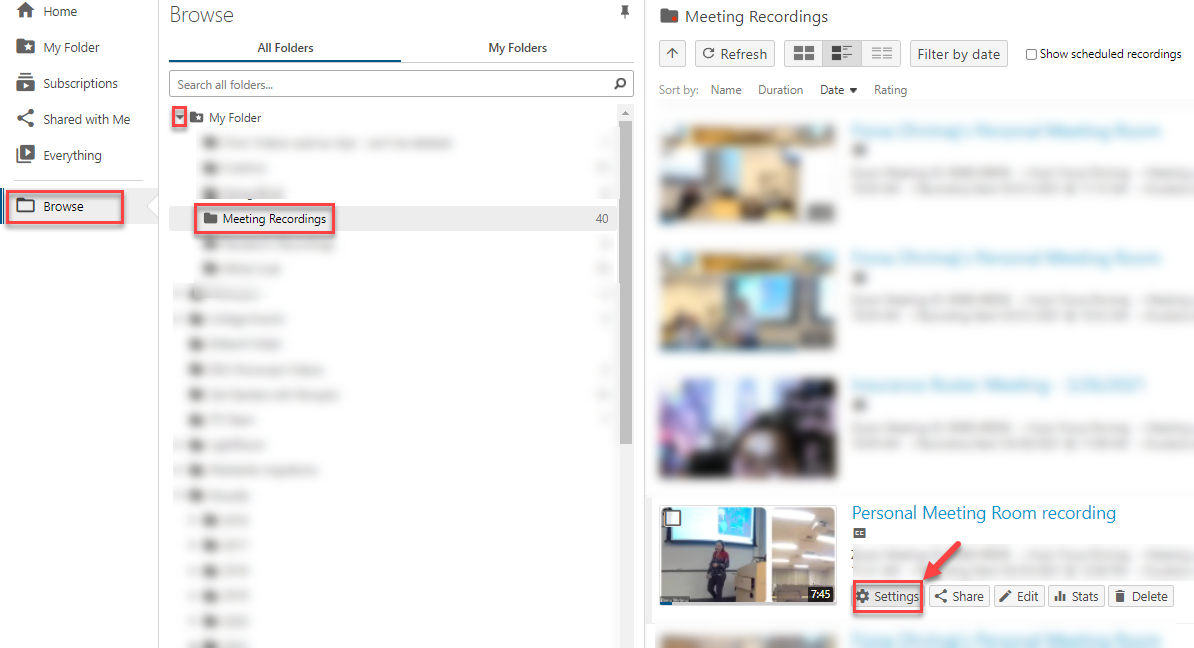
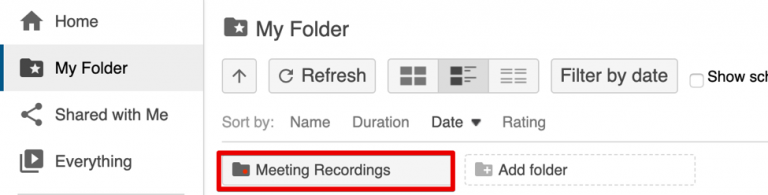
2. Locate the recording session you wish to rename. (For Zoom recordings go to My Folder, followed by Meeting Recordings Folder).
3. Hover over the recording you need to make changes to and select Settings
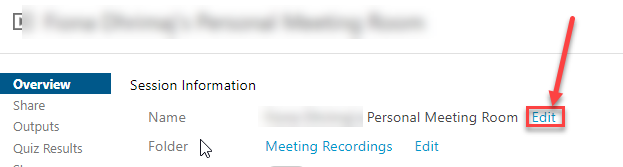
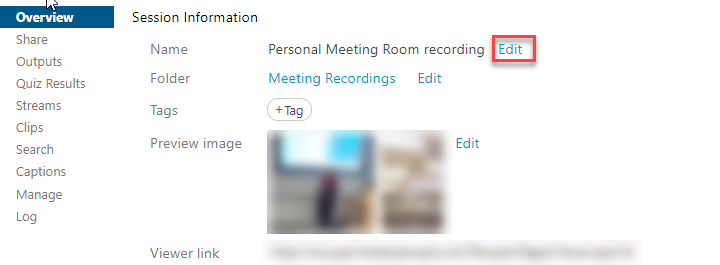
4. When in Settings, in the Overview Section, look for Name on top of the screen and click on Edit.
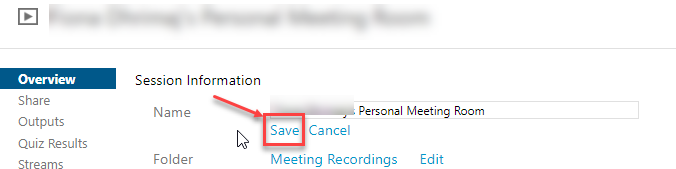
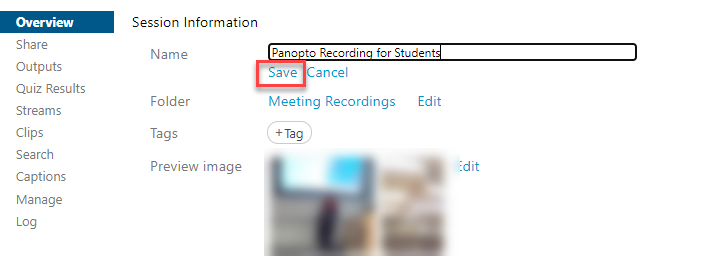
5. Type in the new Title and Date as desired, followed by Save.
This documentation will go over how to use Zoom’s integration with Panopto in order to move your recordings to your Moodle Course.
Prerequisites
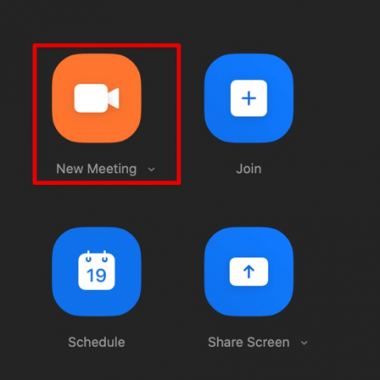
1. Start a Zoom Meeting
1.1. Start a Zoom meeting by selecting New Meeting from the Zoom application on your desktop. (Fig. 1).
2. Recording the Meeting
2.1. Once you’ve started the meeting and have not shared your screen, hit Record to record to the Cloud. (Fig. 2)

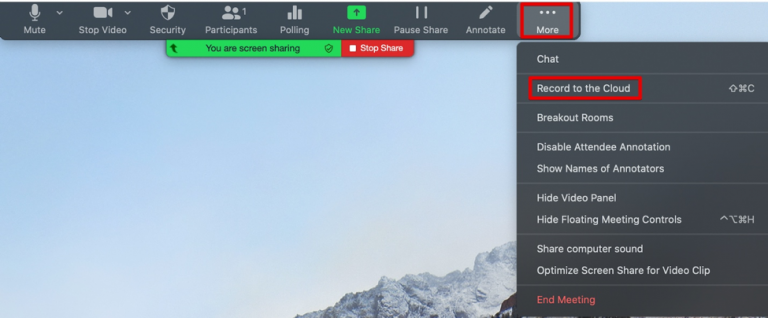
2.2. If you are sharing your screen, open up meeting controls to start recording. Select More and then Record to the Cloud (Fig. 3).
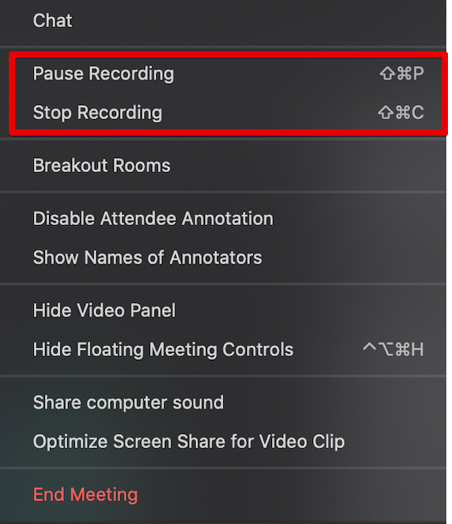
3. Stop and Pause
3.1. Anytime during the meeting, you can Stop or Pause the recording under More (Fig. 4).
4. Accessing a Zoom Recording in the Panopto Library
4.1. Once your meeting has concluded or you’ve stopped the recording, it will be automatically uploaded to your Zoom account and Panopto library. The upload from Zoom to Panopto might take up to 30 minutes depending on the size of the recording.
4.2. You can access your Panopto site in two ways, via Moodle or directly from Panopto. Chrome is the preferred browser for Panopto.
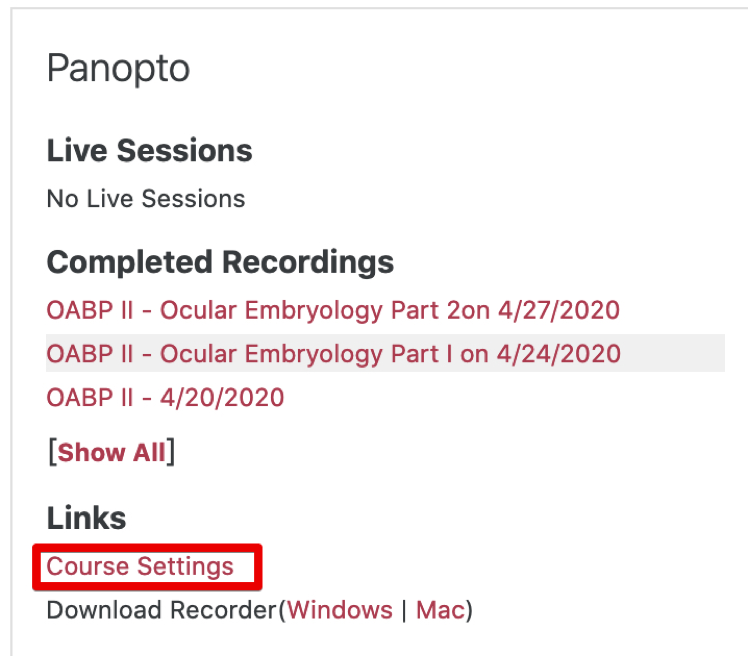
4.3. Access Your Panopto space via Moodle: Login to Moodle, navigate to your course, look for the Panopto block located top right of your course’s page, click on Course Settings. The Panopto page will open up. Close out the first window that pops-up when in Panopto. (Fig. 5).
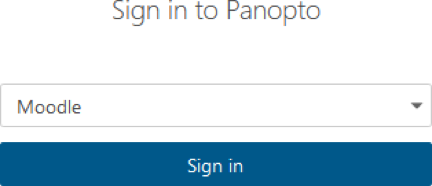
4.4. Access Your Panopto space via Panopto: Navigate to Panopto website. Select Moodle from the dropdown option, then click on Sign in (Fig. 6).
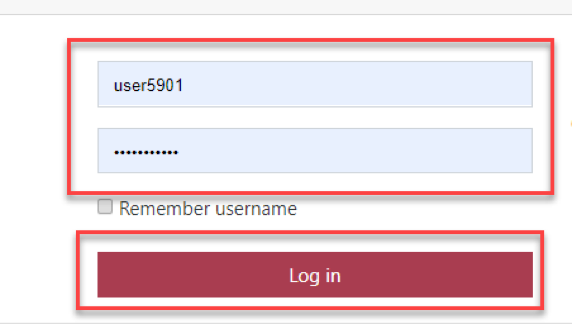
4.5. Enter your Moodle credentials to access your Panopto space (Fig. 7).
4.6. Once you have logged into Panopto, Zoom Recordings will be located in your My Folder in the subfolder Meeting Recordings (Fig. 8).
5. Viewing Your Zoom Meeting in Panopto
5.1. The recorded video streams from the Zoom meeting will be arranged for the best possible playback experience. (Fig. 9).
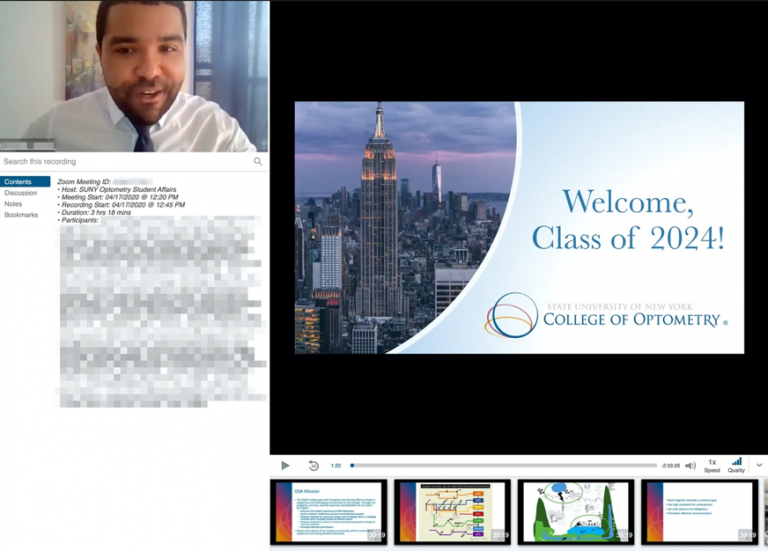
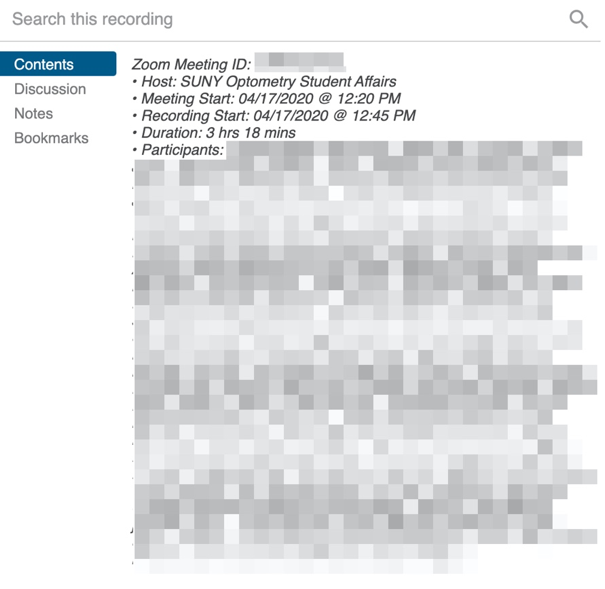
5.2. Panopto will add information about the meeting to the description of the video (Fig. 10).
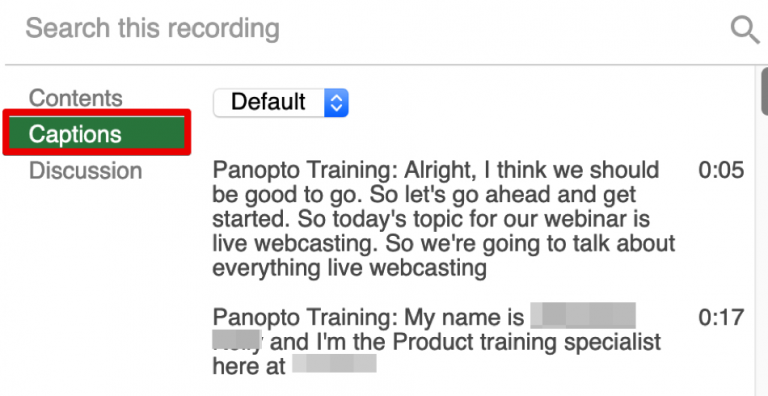
5.3. If audio transcripts are available for your Zoom meetings, Panopto will add them to the video as Captions (Fig. 11). Note: Captions will only be in imported for users with a Business/Enterprise level Zoom account.
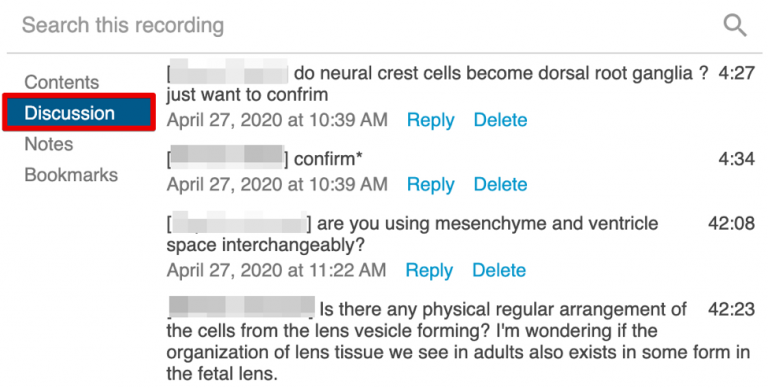
5.4. If chat occurred during the meeting, Panopto will add the chat to the Discussions area (Fig. 12).
6. Moving your Zoom meeting to your Moodle Course Folder in Panopto
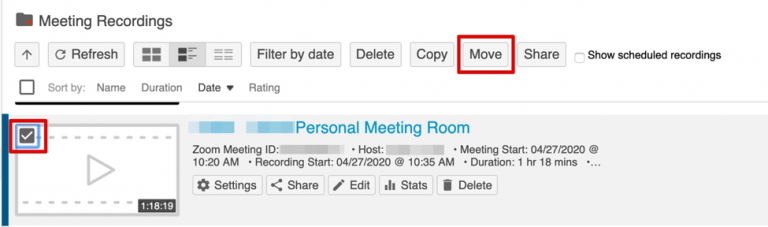
6.1. Hover over the recorded session and check the box in the video area. Click Move and select the desired folder destination (Fig. 13).
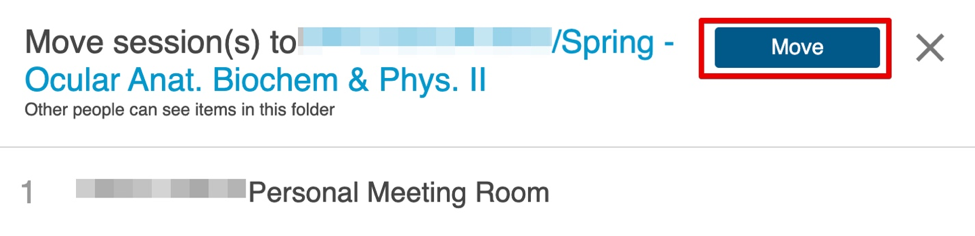
6.2. If your course folder shows on top of the dropdown list, select the name of it, followed by Move for the final step. If your course folder is not located on top of the dropdown list, please expand Moodle, expand the semester year, expand the class year and select the course, followed by Move. (Fig. 14).
7. Move a Video Using Click and Drag
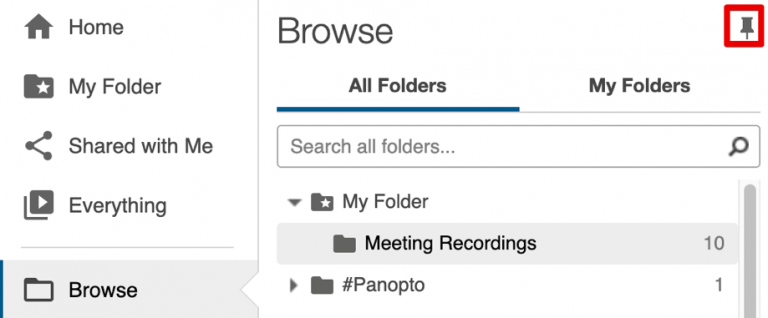
7.1. You can also move a video session using click and drag. Open the Browse area and pin it open by clicking the Thumbtack icon (Fig. 15).
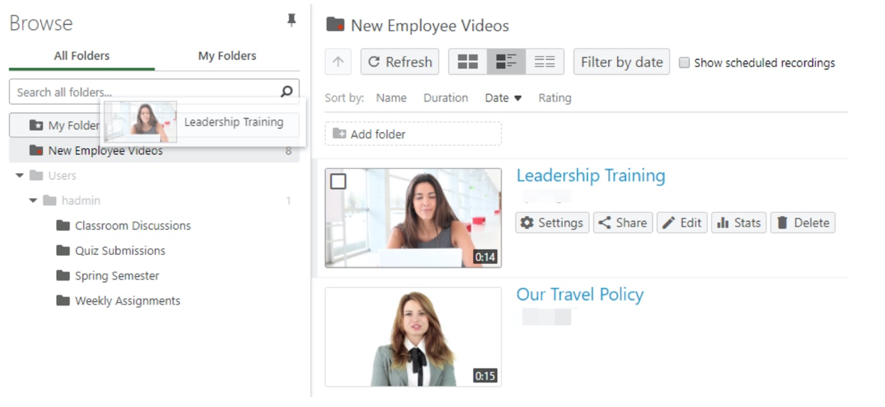
7.2. Click on the video you want to move and drag it to the correct course folder. (Fig. 16).
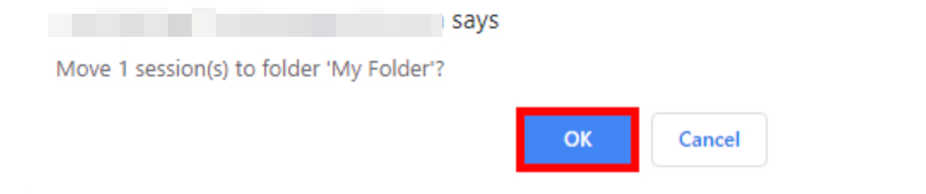
7.3. Click Ok (Fig. 17). This will move the video to the new folder.
8. Confirm your moved recording is showing on your Moodle course
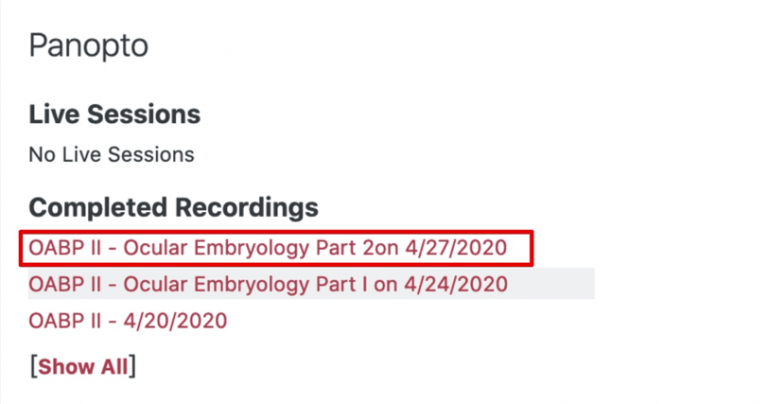
8.1. Login to Moodle, navigate to your course, look for the Panopto block located top right of your course’s page. The recording you just moved in Panopto, should be the top link you see under Completed Recordings (Fig. 18).
All Zoom Cloud Recordings are automatically saved in Panopto (our lecture capture software). If you remove your Cloud Recording in Zoom it will not remove it from Panopto. Wait at least a day or two before deleting any Zoom recordings, as it takes hours for the entire recording to fully upload to Panopto.
All lecture recordings are moved by the Media Department to their respective folders, so you won’t find them in your personal meetings folder.
To View your Zoom Cloud Recordings in Panopto
If you’d like to share a link to your Panopto recordings, please see below what options are available.
You can also share the video with a wider audience. Select Change from under Who can access this video to change the sharing option. A pop-up list will appear with the following sharing. Note: a video inherits sharing permissions from its parent folder. A user may adjust this sharing permission to be more public than the parent folder setting, but not more private. Additionally, your administrator can change what sharing options are available to you, so you might not see all of these options.
If you have set Who can access this video to any option except Restricted, you can copy and share the link by selecting the Copy Link button that appears. Link copied will appear at the bottom, indicating that you have successfully copied the link. You can paste the link in an email. Optionally, select the checkbox next to Start at and add the timestamp at which you’d like the video to start when the audience opens the link provided.
Panopto URL: sunyopt.hosted.panopto.com
Enter your Moodle credentials to access your Panopto space.
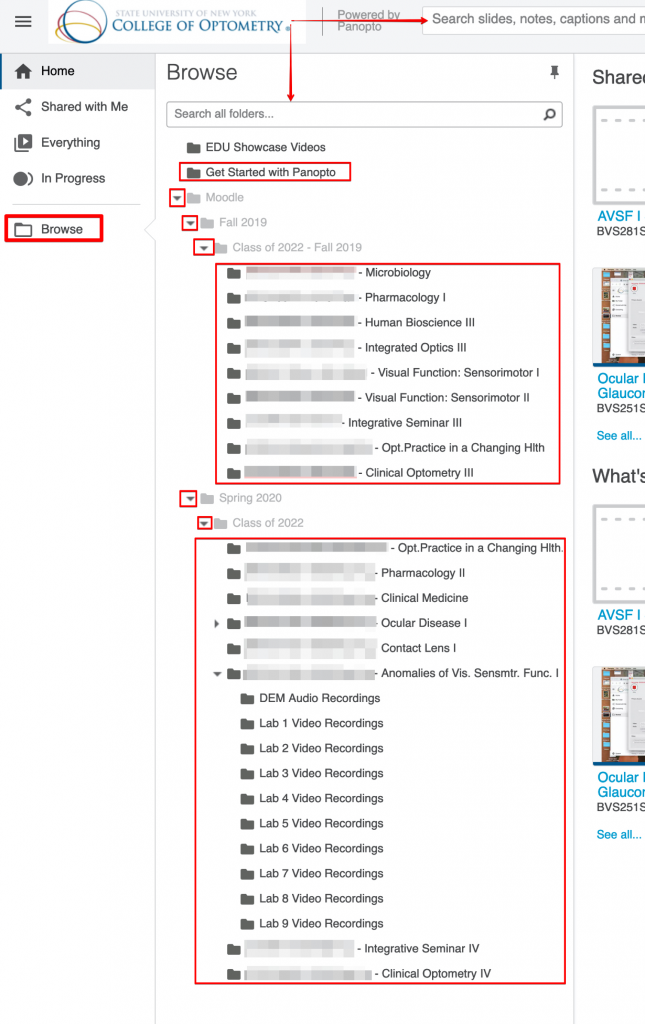
Once in Panopto, follow the below steps to navigate the site and find recordings shared with you.
This documentation will show you how to use the Panopto iOS application on an iPad & iPhone. Using the Panopto App on mobile devices is preferred over using a mobile browser because the app is easier to use and includes video compression functions.
Prerequisites
1. Login
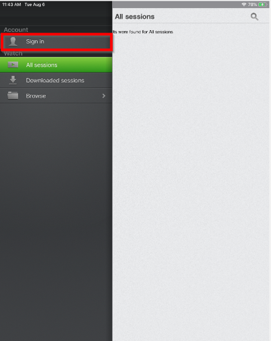
1.1. To login to the iOS app, swipe the screen to the right or tap the menu button in the top left corner, and then tap Sign In (Fig. 1).
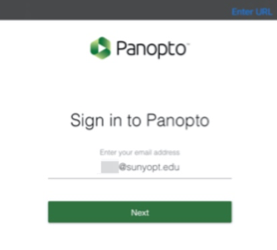
1.2. Enter your SUNYOPT email address the first time you sign-in, Panopto will direct you to the correct Panopto site when you select Next (Fig. 2).
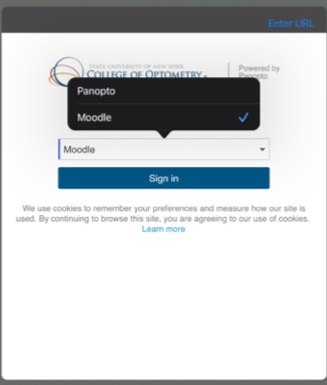
1.3. Select Moodle from the dropdown list, followed by Sign In. (Fig. 3).
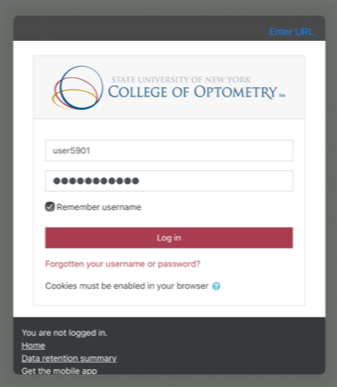
1.4. Enter your Moodle Username and Password, check box for Remember username and click Log In. (Fig. 4).
1.5. If you Log in and you see the screen below, please close the app completely and open it again to Log in. (Fig. 5).
2. View Panopto Sessions
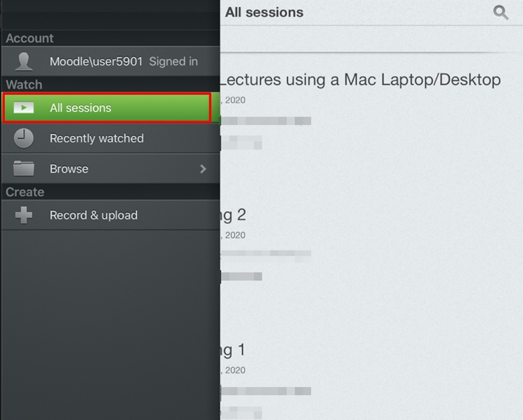
2.1. To view sessions on the Panopto server, tap the menu button, and then tap All Sessions to see all of the sessions that your account has access to.(Fig. 6).
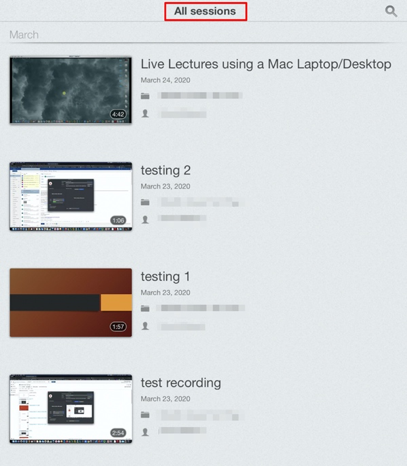
2.2. Tap the Title of the recording to begin playing it (Fig. 7).
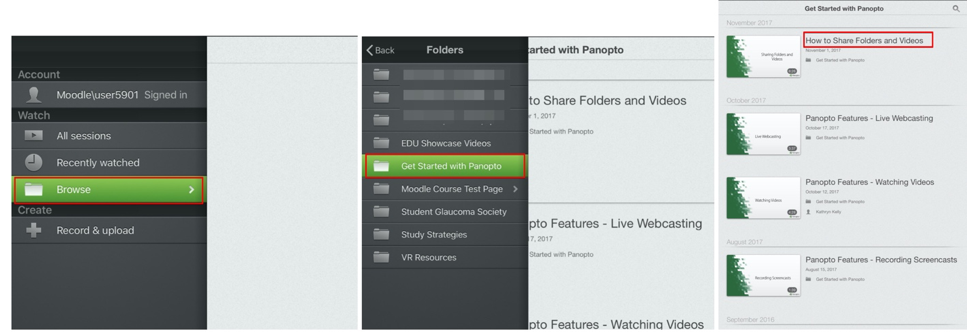
2.3. You can also choose Browse, which will show you a list of folders that your account has access to. You can tap the Folder Name to see a list of recordings in that folder and tap Recording Title you would like to view, and it will play (Fig. 8).
3. Viewer Overview
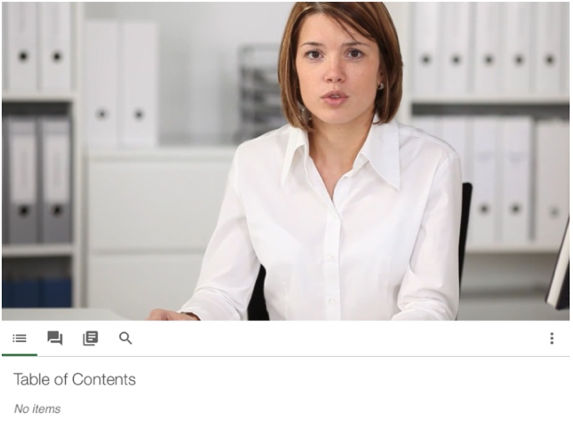
3.1. Playing a session will stream the MP4 version of the session. You can also access Table of Contents, Leave Comments, Take Notes, and Search within a video (Fig. 9).
3.1.a. Table of Contents: Click on any of the table of contents entries to view that portion of video.
3.1.b. Discussions/Comments: Allows users to have discussions with other users and instructor.
3.1.c. Notes: If instructor allows users to leave notes during the video, you can take notes for the lecture. These notes are private and cannot be seen by other users.
3.1.d. Search: This feature allows viewers to search for keywords within the video.
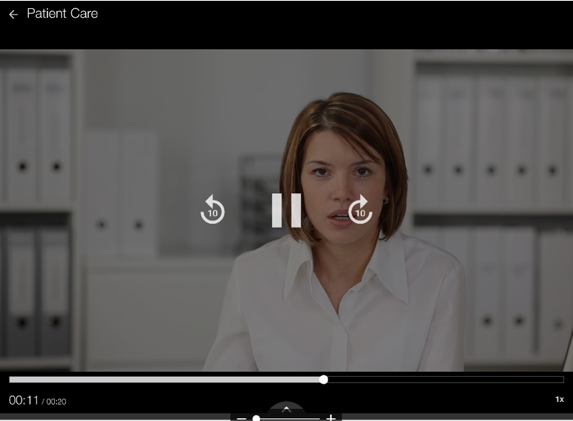
3.2. Tap the screen to show the option to seek, rewind 10 seconds, play/pause, and fast forward (Fig. 10).
1. Log in to the Panopto Web Portal via Moodle or directly from the SUNYOPT Panopto Web Portal login page.
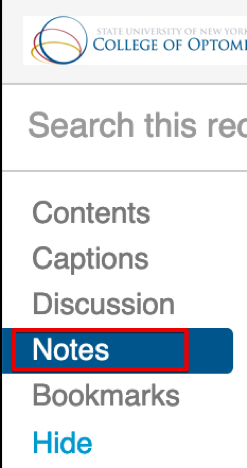
2. Click the “Notes” link is on the left-hand side. (location depending on the streams captured)
3. Once expanded, a field to enter notes will display. NOTE: Your timestamp starts the second you start typing.
4. Hit Enter/Return to submit the note into the field above.
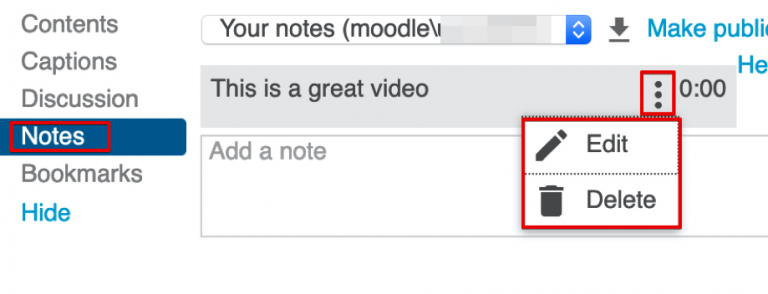
5. To edit/delete a submitted note, click on the note you wish to change. 3 dots will appear, click on it to either Edit or Delete the note. (Timestamp remains the same after editing as well)
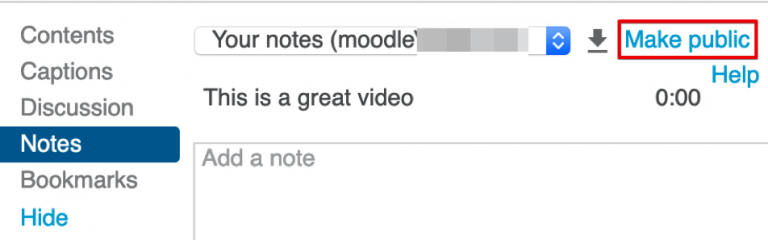
6. To change view of notes, select “Make public” above note’s field. NOTE: By default, notes under your username will be private notes viewable only to you.
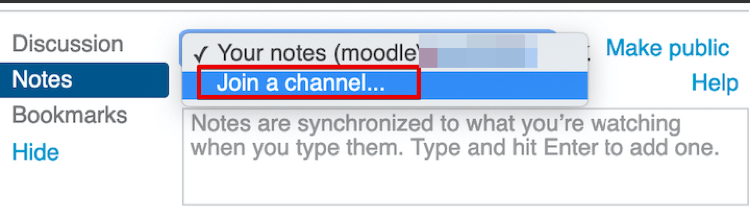
7. To take notes in a channel by either selecting or creating a channel, click on the drop-down menu above note’s field. (Useful to collaborate your notes with groups!)
8. Create a channel by clicking the “Join a channel” option and type the name of the channel you wish to join or create. (Share the channel name to add others into sharing!)
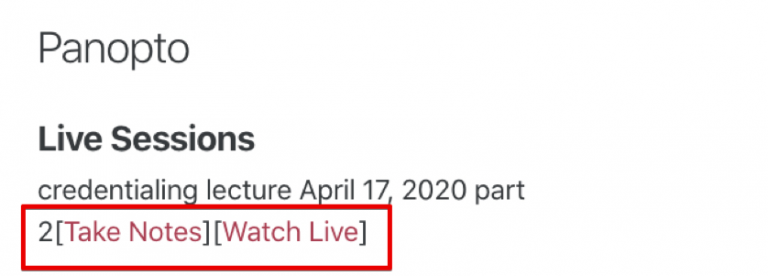
9. To create Live notes, find a session that is currently being recorded by going to your Moodle course.
10. Click on Take Notes on the Panopto block or click on “Watch Live” and take notes when the pop-up window opens. (Notes are time stamped and aligned with the recorded session for later use).

Poll Everywhere is a student response system (SRS), also known as a audience response system that allows the polling or surveying of students in or outside the classroom, synchronously or asynchronously. Students can answer questions to polls or surveys with common devices like mobile phones, tablets, or laptops. Poll Everywhere enables instructors to quickly assess students’ comprehension of course content, improve student participation and trigger class discussion with student responses. Students benefit by engaging in active learning, promoting critical thinking and providing real-time, immediate feedback of responses and displaying the results in graphical form to the entire class. In addition, students respond to your polls online or via SMS texting. No clickers are required.
Poll Everywhere integrates seamlessly with PowerPoint, Keynote, and Google Slides. Wherever you create presentations, Poll Everywhere creates two-way conversations with your workforce, class, or live audience.
1. Accept Invitation sent to your SUNYOPT email account
To accept, click Accept Invitation.

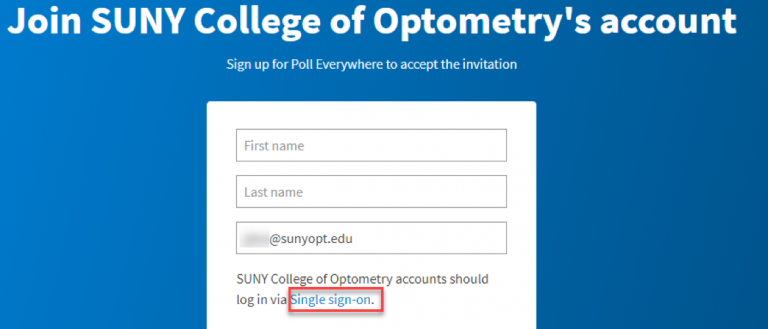
2. Log in to Poll Everywhere with your Office365 Account
Poll Everywhere now uses single-sign-on. To start, click on Single sign-on.
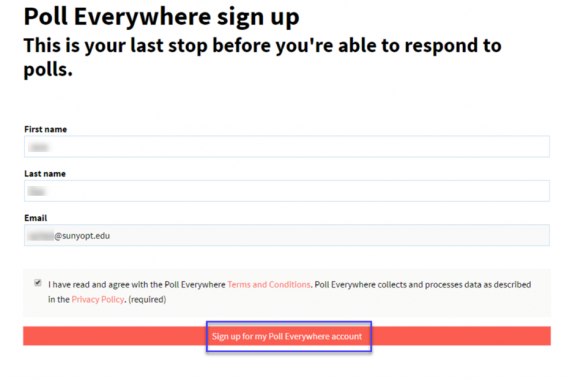
3. Sign up for your Poll Everywhere Account
Confirm your name and email, check the box under Terms and Conditions and click on Sign up for my Poll Everywhere account.
4. Accept Invitation
Please confirm your invitation by clicking on Accept invitation.

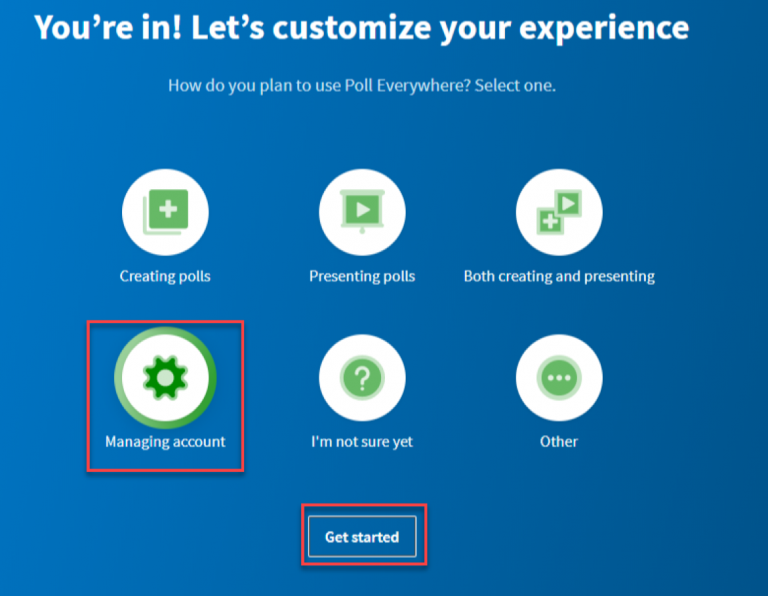
5. Success!!
You are now logged in! Pick any option to get started.
For help in getting started, watch the video guides at https://www.polleverywhere.com/videos

Step 1: Before the online meeting, close all unnecessary apps. If you have alarms or notifications you don’t want the audience to see, make sure you adjust those settings beforehand.
Step 2: Open the activity you’ll be presenting on PollEverywhere.com by navigating to My polls.
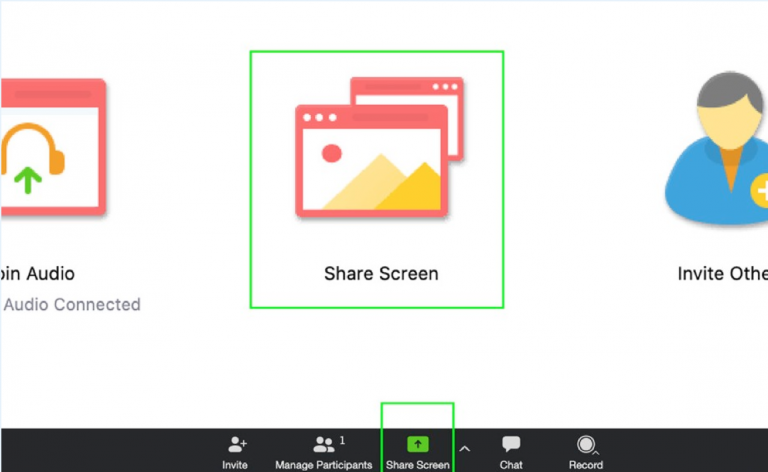
Step 3: Launch Zoom (either by using a browser or by launching the desktop app) and start the meeting.
Step 4: Select the screen-sharing feature and share your screen.
Step 5: Direct participants to your unique PollEv.com URL or submit responses via SMS.
Step 6: Enter fullscreen mode to present and activate your Poll Everywhere activity. Advance to the next one by using your arrow keys or pressing “Next” and “Previous” in the bottom right-hand corner of the screen.
As participants respond, watch results fill the screen and bring the conversation to life.
Moodle (Modular Object-Oriented Dynamic Learning Environment) is an online learning management system and provides course rooms to teachers, lecturers and/or professors. All registered SUNY Optometry faculty, staff and students using their network account (userxxxx) can access it. It is available both on campus and externally to anyone having access to the Internet. In Moodle, each form of learning is called a “course”. There is no difference between “Seminar”, “Training”, “Course”, or other designations.
Moodle is a free, open source software package designed using sound pedagogical principles, to help educators create effective online learning communities. It is the most widely used LMS in the world and currently has over 90 million users world-wide (and growing!).
Moodle is used by SUNY Optometry to support lecturers in delivering online learning. It has a range of functionality, which can combine and enhance the traditional learning environment in an online setting. This functionality includes content management, email, discussion, calendar and chat room to enhance teacher to student communication. It is intended to complement and enhance face-to-face lecturing.
Moodle is accessible from moodle.sunyopt.edu
All registered SUNY Optometry faculty, staff and students can log in by entering your network username (userxxxx) and password in the login area.
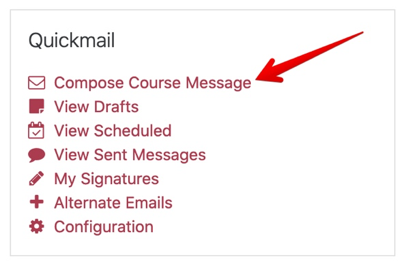
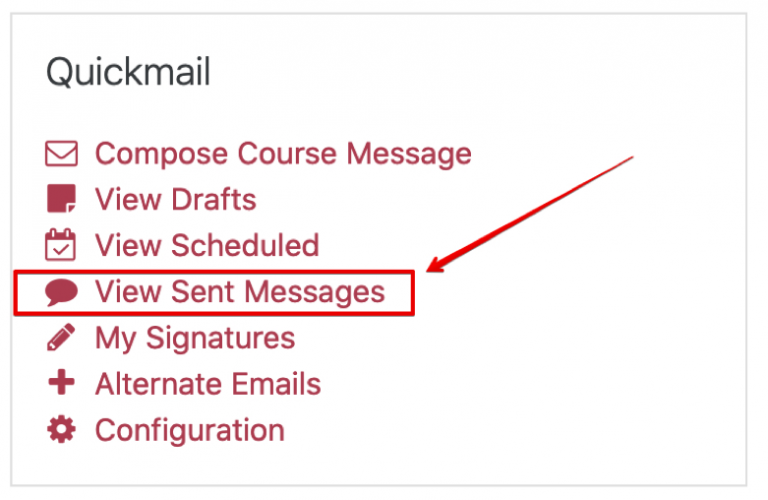
The Quickmail block is a convenient block in Moodle that allows instructors to send emails to course members. Students cannot reply to Quickmail messages.
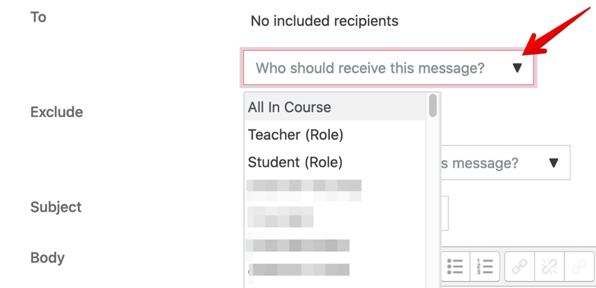
1. From the course homepage, click Compose Course Message from the Quickmail block, located to the right side on the course page. The Quickmail page will open.
2. Select the recipients from the To dropdown
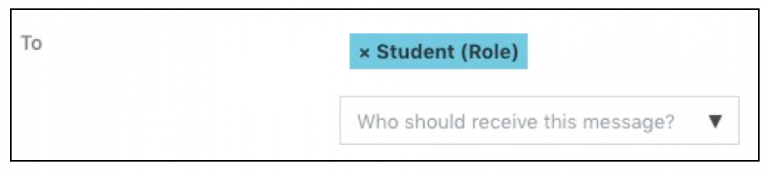
If you are sending a message to all students, you should select “Student (Role)”.
If you’re sending a message to a specific group of students, you should select the desired student names.
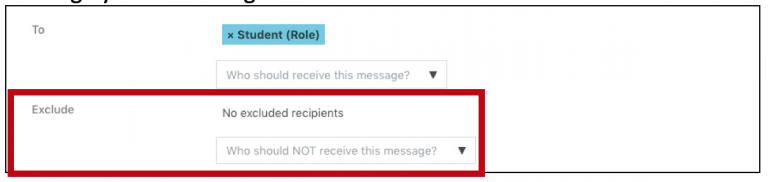
3. Optional: From the Exclude drop down, select recipients who should not receive the message you’re sending.
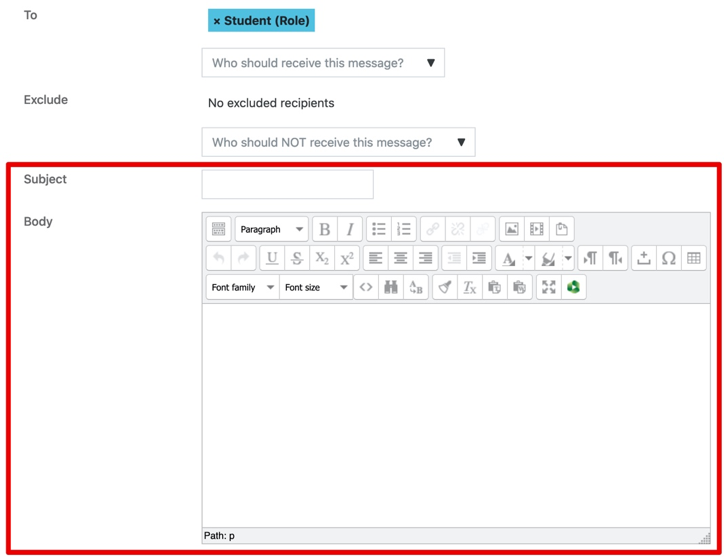
4. Next, add a subject for your message and compose your message in the Body. If you have any attachments, you may upload those to the attached files section.
5. For the remaining options, see below
6. View Your Quickmail History for the Course : The View History screen lists messages you have sent from the course you are in.
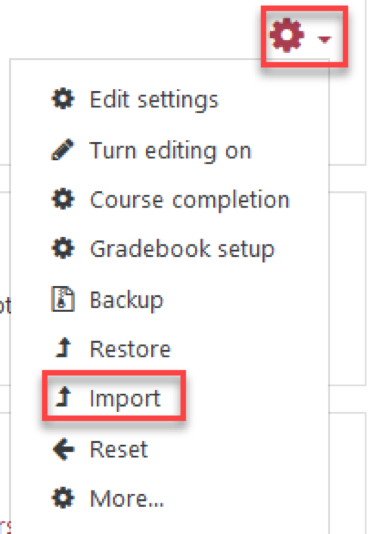
The easiest way to import your old course materials to your current course is to use the Import function. *It is very important that you’re on the new course before you start the Import process.
1. Go to the current course on Moodle and click on the Administration gear in the right corner of the page, select Import from the drop-down menu.
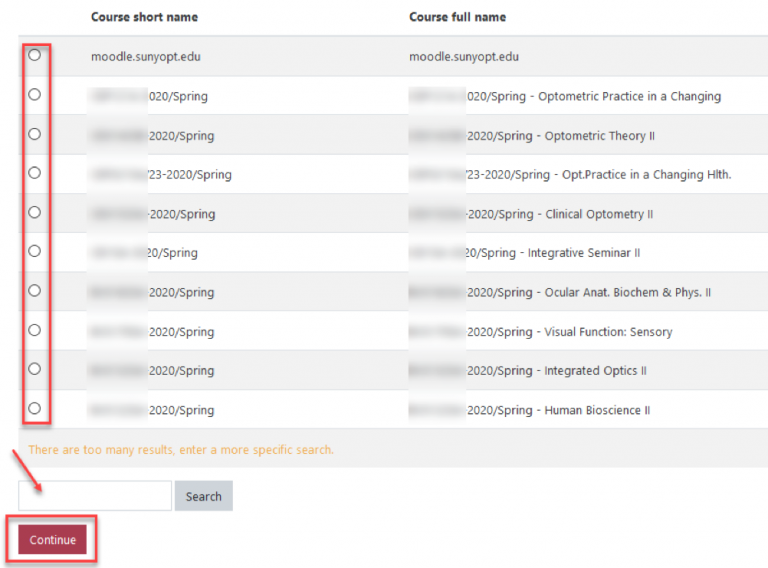
2. From the Import page, select the course you want to transfer and click Continue. If the course is not listed, use the Search box. NOTE: Only courses for which you are the instructor will appear on this list.
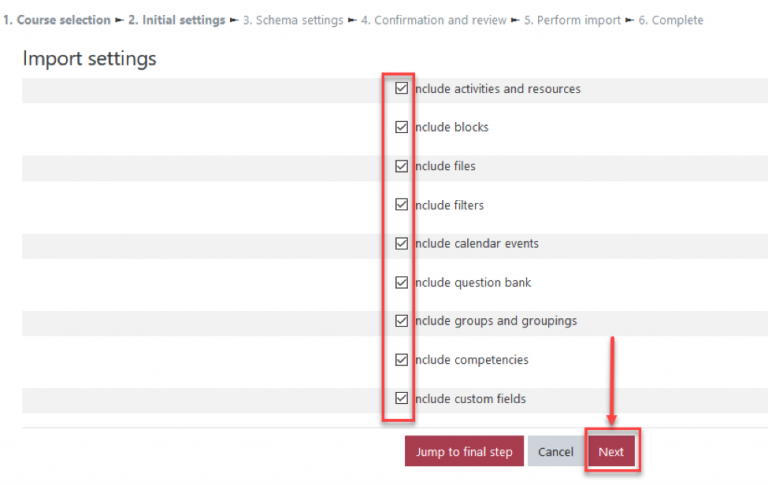
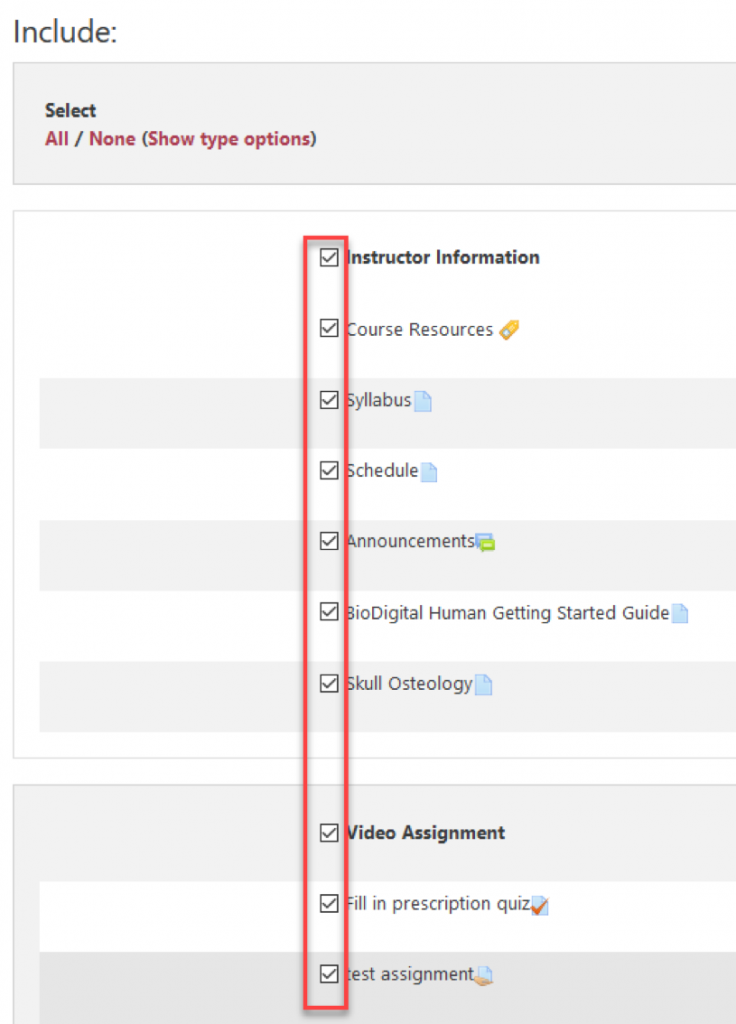
3. Next, you will see a page with options on what to include in the import. If you would like everything to transfer, select all four. If you would like to exclude activities, blocks, filters, or the question bank, uncheck the respective box or boxes and click Next.
4. You will then see a page that shows all of the files on your course site. Deselect any files that you do not wish to transfer and then click Next.
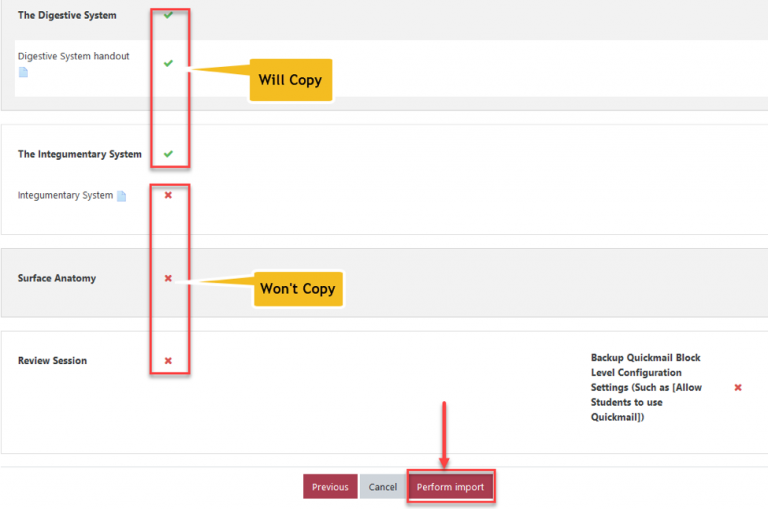
5. On the next page, you will be able to view everything that has transferred. If there are any mistakes, fix them at this point by clicking previous and going back to the pages before. Once you are satisfied with everything that has been imported, select Perform import.
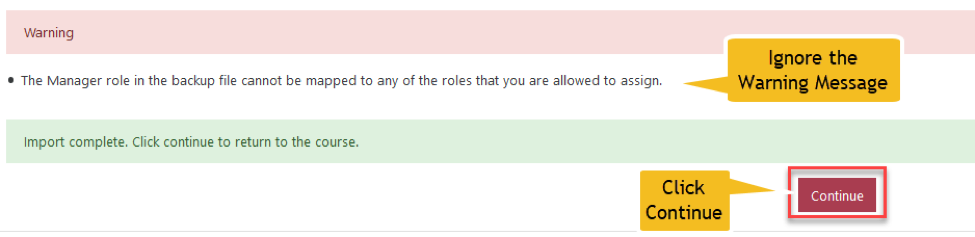
6. Select Continue once the files have finished importing and you will be redirected to the course where your materials have been imported.

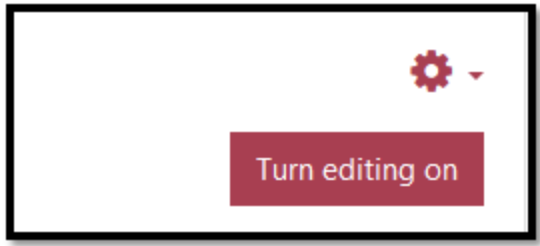
In order to make any changes to your course, you’ll need to Turn Editing ON. The button is located at the top right on your course page.
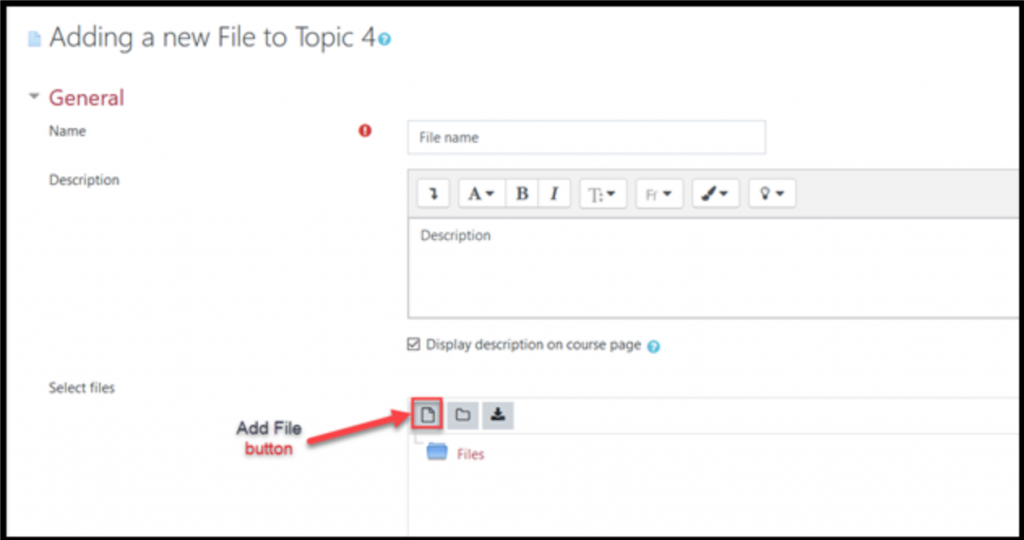
There are two ways to add files to your Moodle course.
Moodle allows you to drag files from your computer directly to your course page.

If you want to add a file manually, you will need to configure additional options such as a custom name or description.
All Moodle courses at SUNY College of Optometry use the Simple Weighted Mean of Grades aggregation methods by default. Grade aggregation refers to the method by which scores from multiple assignments are combined to form one score that accurately reflects its components. Moodle has several different aggregation methods. The following guide will explain how to change aggregation methods in your gradebook and how each works. For details not included in this documentation, visit Moodle’s own documentation.
Click the gear menu top right of your course’s page, and then click Gradebook setup.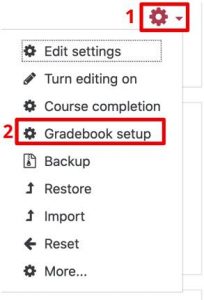
Select the Edit from the drop-down menu of the course folder or the desired category, followed by Edit Settings.
To change the Aggregation method, you click on the two arrows next to the box and a list of all available aggregations will appear. Make any necessary changes and click Save Changes at the bottom of the page.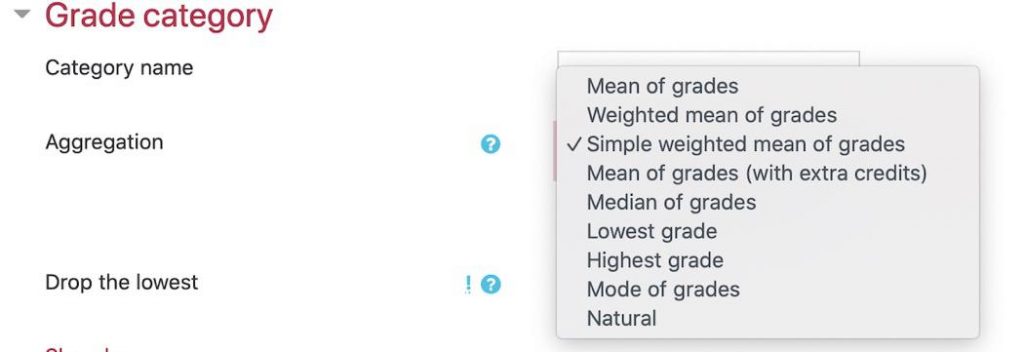
As mentioned above, you may wish to create a grade item for, e.g., participation, attendance, or for assignments or activities that are handed in directly/physically (i.e., not submitted through Moodle itself). To add new grade items to the grader report without adding an activity to the course page:
Moodle provides a number of ways to assign a grade to a particular item, depending on what type of grade item it is. Note that it is possible to assign a grade that exceeds the maximum point value for the item. For example, you may want to assign a grade of 105/100 on an exam. This is fine and Moodle will calculate the score appropriately, taking into account the bonus points.
The easiest and least error-prone way to grade items created and submitted through Moodle, such as an Assignment or Quiz, is through that particular item’s grading interface. For example, if you have an Assignment, you can click on that particular assignment in your course and assign grades through that interface. Grades will be automatically reflected in the grade book.
If you have created any manual grade items, the easiest way to grade them is through the Single view interface:
You may want to designate a grade item as extra credit. Please note that extra credit only functions as expected if you are using either Natural weighting or Simple weighted mean of grades. It is not recommended to explicitly designate something as extra credit under other aggregation methods.
You may wish to have a grade item that is ungraded; for example, you want students to submit an item through Moodle, but you will not assign a grade to it. This can be useful for, e.g., ungraded rough drafts or other documents that you might want to provide comments for, or have a record of, but that will not carry a grade. In this case, the Assignment becomes effectively a dropbox. To do this, create an Assignment as normal, but within the Grade section, select None as the Type.
Similarly, you may wish to provide a grade for something like a rough draft in order to show a student what they would have received, but ultimately you don’t want the grade to count towards the overall course grade. To do this, within the Gradebook setup page, simply override the weight of a particular grade item and set it to 0. That way, you can grade an item as normal, provide feedback, etc. but the grade will not “count.”
It’s relatively easy to control how grades are displayed for an overall course, or even for a single assignment or category. You might want to display the grade for a particular assignment or category as the total points earned, while the overall course grade can show up as the percentage and total points earned:
Sometimes faculty like to enter grades into Moodle using Excel rather than directly through Moodle gradebook. This method requires one to export then import the gradebook.
Before following the instructions below, be sure to have the assignments or grade items already established in your grade book.
For most aggregation methods, the grades are first converted to percentage values (interval from 0 to 1). They are then aggregated using one of the strategies below. The point or percentage value out of the maximum possible grade of a category is found based on this aggregation.
Important: An empty grade is simply a missing gradebook entry and could mean different things. For example, it could be a participant who has not yet submitted an assignment, an assignment submission not yet graded by the teacher, or a grade that has been manually deleted by the gradebook administrator. Caution in interpreting these empty grades is thus advised.
This aggregation method is the sum of all grade values, scaled by weight. When its weights are not adjusted, it is the same as points earned divided by points possible.
This is the only type that does not convert the grades to percentages internally. An example for assignments A1, A2, and A3 follows.
A1: 70/100
A2: 20/80
A3: 10/10
Earned: 70 + 20 + 10 = 100
Maximum: 100 + 80 + 10 = 190
Aggregated grade: 100/190
When the natural aggregation strategy is used, a grade item can act as extra credit for the category. This means that the grade item’s maximum grade will not be included, but the item’s earned points will. Note that extra credit will not be awarded beyond the maximum possible grade. The following is an example of two required assignments and one extra credit assignment.
A1: 20/100 (“Act as extra credit” box checked in item’s grade settings)
A2: 70/75
A3: 19/20
Earned: 20 + 70 + 19 = 109
Maximum: 75 + 20 = 95
Aggregated grade: 95/95
Note that even though 109 points were earned, the category’s maximum grade is 95. The aggregated grade is capped at 95/95.
In natural aggregation, weights are automatically given to items. If you change the weights in the boxes, natural aggregation no longer functions like the examples above. Natural aggregation functions as a sum of grades only when the weight boxes are left alone.
If a category’s weight is set to 70, that category will be worth 70 percent of the overall course grade. The weights of all other categories will be adjusted to total 30. This occurs because natural weighting forces weights to add up to 100. Essentially, changing the weights changes the aggregation method to weighted mean of grades (see below) where the weight values given are percentage of the total. This is useful for adjusting your gradebook to match the categories and percentages listed on your syllabus, if you have them.
If you want to find the mean of items, each item will have the weight of 100 divided by the number of items. This is the same as the mean of grades aggregation strategy.
This method is simply the sum of all grades divided by the total number of grades.
A1: 70/100 = .7
A2: 20/80 = .25
A3: 10/10 = 1
Category max: 100
Number of scores: 3
Aggregated grade: (0.7 + 0.25 + 1.0)/3 = 0.65 –> 65/100
Each grade item can be given a weight that influences the importance of each item in the overall mean. The process is as follows:
An example with three assignments is shown below.
A1 70/100 = .7, weight 10
A2 20/80 = .25, weight 5
A3 10/10 = 1, weight 3
Category max: 100
The difference of this method from the weighted mean (above) is that simple weight is calculated as maximum grade for each item.
Simple weighted mean of grades is essentially natural grading, so it is recommended that you leave your aggregation on natural.
Another note about this strategy: it is intended for gradebooks with categories and for categories with curved items.
The process is as follows:
The following examples have minimum grades of 0 for all assignments.
When the simple weighted mean aggregation strategy is used, a grade item can act as extra credit for the category. This means that the grade item’s maximum grade will not be added to the category total’s maximum grade, but the item’s grade will. For example, if A3 is marked as extra credit in the above calculation:
Arithmetic mean with a twist. Essentially you will find the mean of scores, but you will divide by number of non-extra credit assignments, not the total number.
For weighting, a value greater than 0 treats a grade item as extra credit during aggregation. The weight is a factor by which the grade value will be multiplied before it is added to the sum of all grades.
The process is as follows:
For example:
Login to Moodle and look for the course you wish to hide or show in your Custom Course Menu. Click on the course name to access the course. Example Course Below.
In your course, click Edit Settings in the Course Administration menu.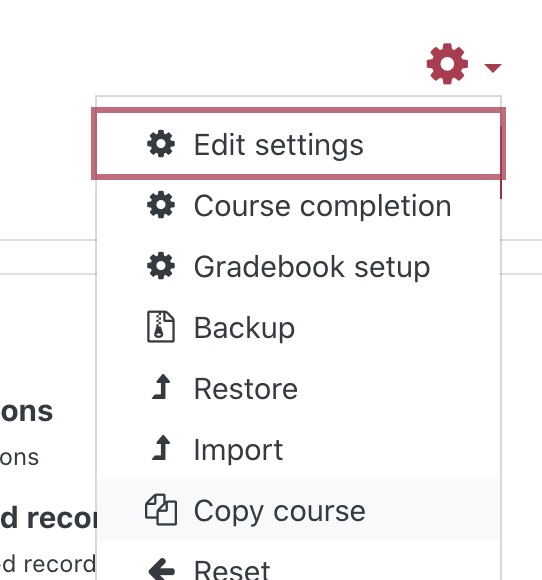
In the course settings, under General settings, you can set the course Visibility options to Hide or Show. Make sure to scroll down and click Save when you have made your selection.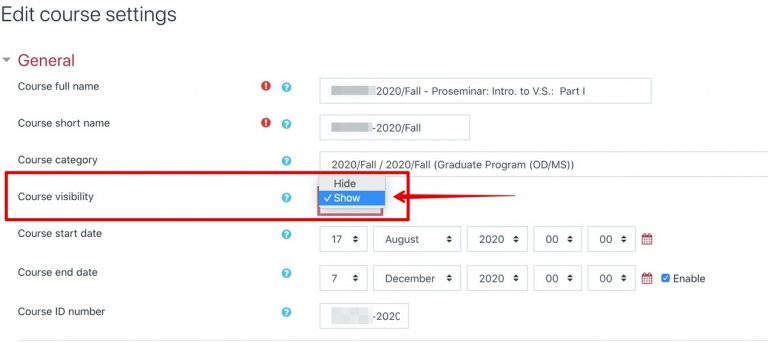
It can often be useful for instructors to impersonate a student role, so that they can see the course as students will see it and verify content is available/hidden as needed.
Click on your username in the upper right and choose Switch role to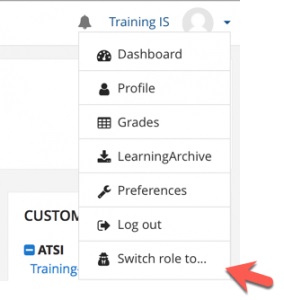
Choose the role you want to impersonate (usually student)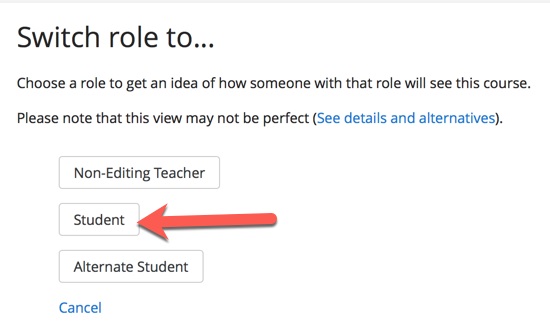
You are now impersonating a student role. Your profile notes the assumed role. Any hidden items in the course will not appear in this view.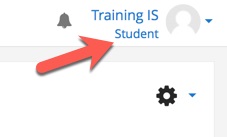
To return to your normal role, visit your user menu again.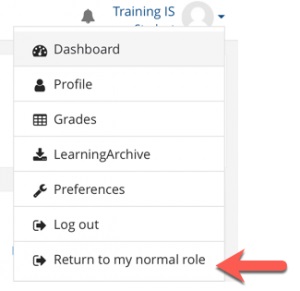
To retrieve your voicemails from outside:
Listen to Your Messages:
Playback Options (while listening to a message):
End of Message Options (after listening to a message):
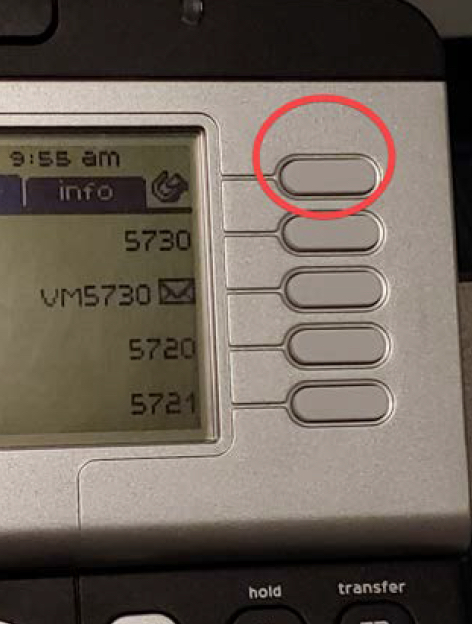
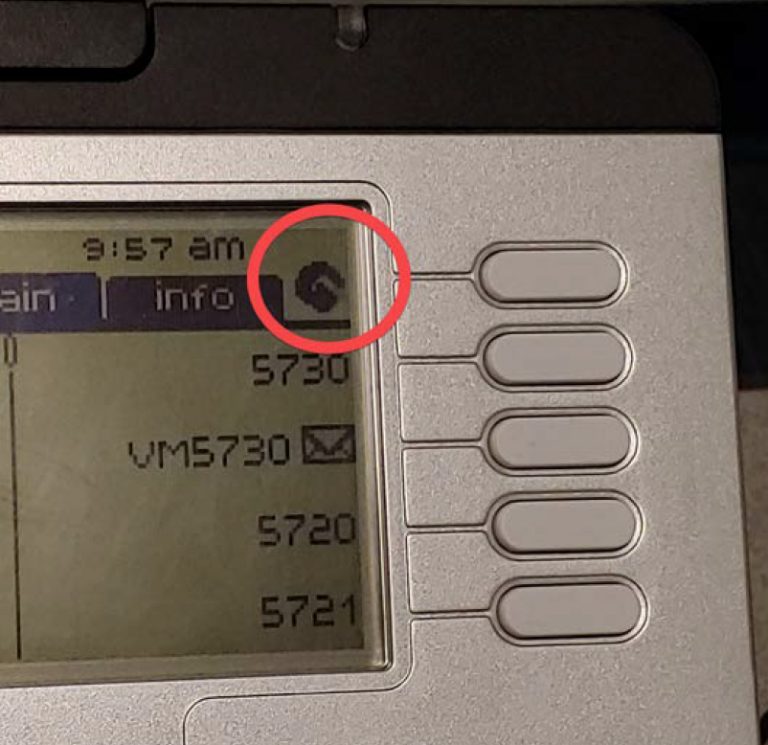
1. On your phone set click the button located on the top right corner of the main screen:
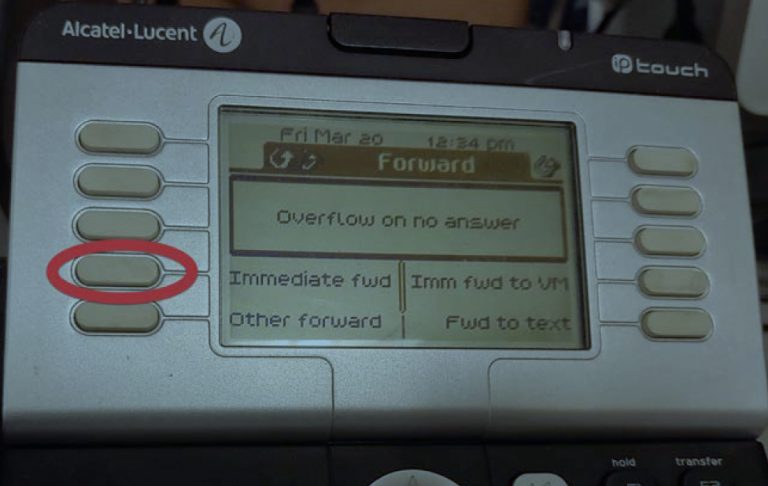
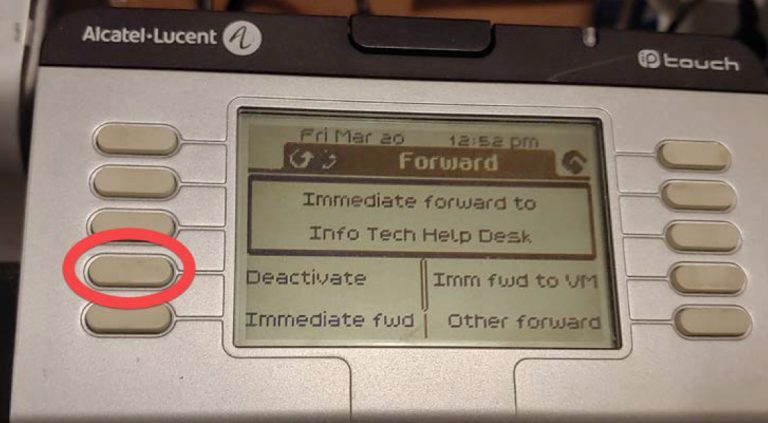
2. Click the button next to “Immediate fwd”:
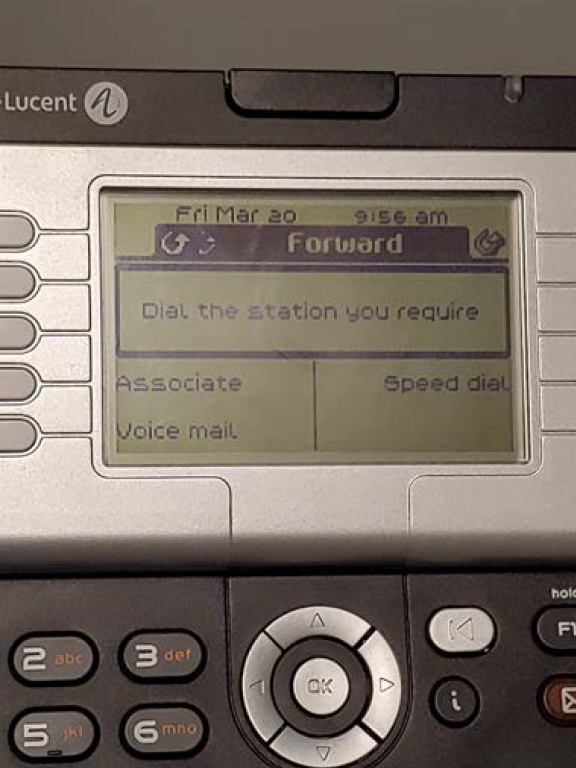
3. The screen will display the message “Dial the station you require”. If you forward your phone to an external phone number press 9 then the external number starting with 1 (e.g. 9 1 212 555 1212)
4. The phone set will display the message “Programming accepted”. Press the “End” key on your phone or pick up the handset and hang up:
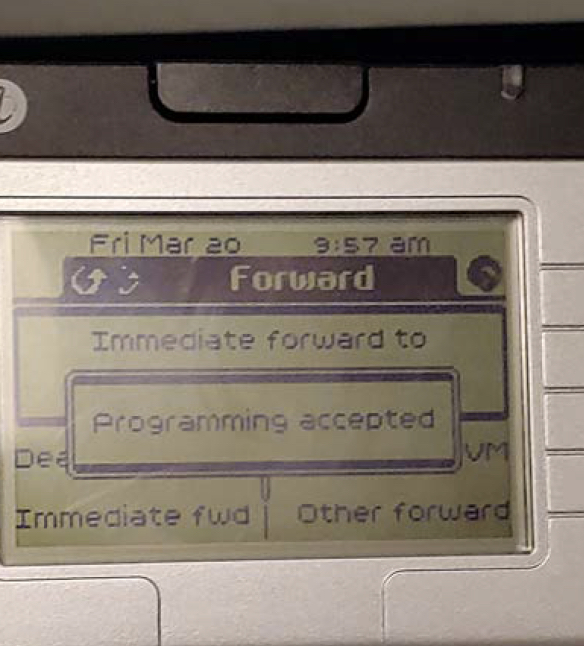
You will see the Call Forwarding icon (round arrow) rotating on your main screen:
5. To remove the forward click the top right button on your phone (next to Call Forwarding icon).
6. Click the button next to “Deactivate”:
7. Your phone will display “Programming accepted”. Press the “End” key on your phone or pick up the handset and hang up.
 Adobe
Adobe  Operating System